Use K8SaaS with Azure Bastion
Introduction
Due to security concerns you may need private access to k8saas. There are two ways to get one:
- use the TrustNest VPN provided by IT Team (based on Zscaler)
- build you own bastion in azure
Special case: Integration from on-premise platform or other cloud provider
- For this special case, you should enter in contact with the TrustNest IT Team. They are the only team that can manage this type of interconnection. Indeed, our Information System Security Policy (ISSP) does not allow any direct interconnection between core-service / project environment with on-prem infrastructure. This interconnection must be setup centrally.
The purpose of this document is to describe step by step howto set up an end-to-end azure bastion integration with k8saas. Please feel free to update the naming convention with your project context.
Content of this Tutorial
Step 1
- Create a development resource group
- Create a tooling resource group
- Create a vnet / subnets / bastion
- Create a key Vault to store secrets
- Create a virtual machine as rebound device
- Add the ssh key in keyvault
- Test your bastion access
Step 2
- Deploy your first hello world application
- Expose your application using an ingress
- Access to your application using rebound VM
Architecture
The high level application architecture of this tutorial is described here:

As you notice, in opposition to BYOD use case, the communication between the software engineer laptop is forbidden. (red arrow). To access to the application, you should use azure bastion.
The high level technology architecture of this tutorial is described here:
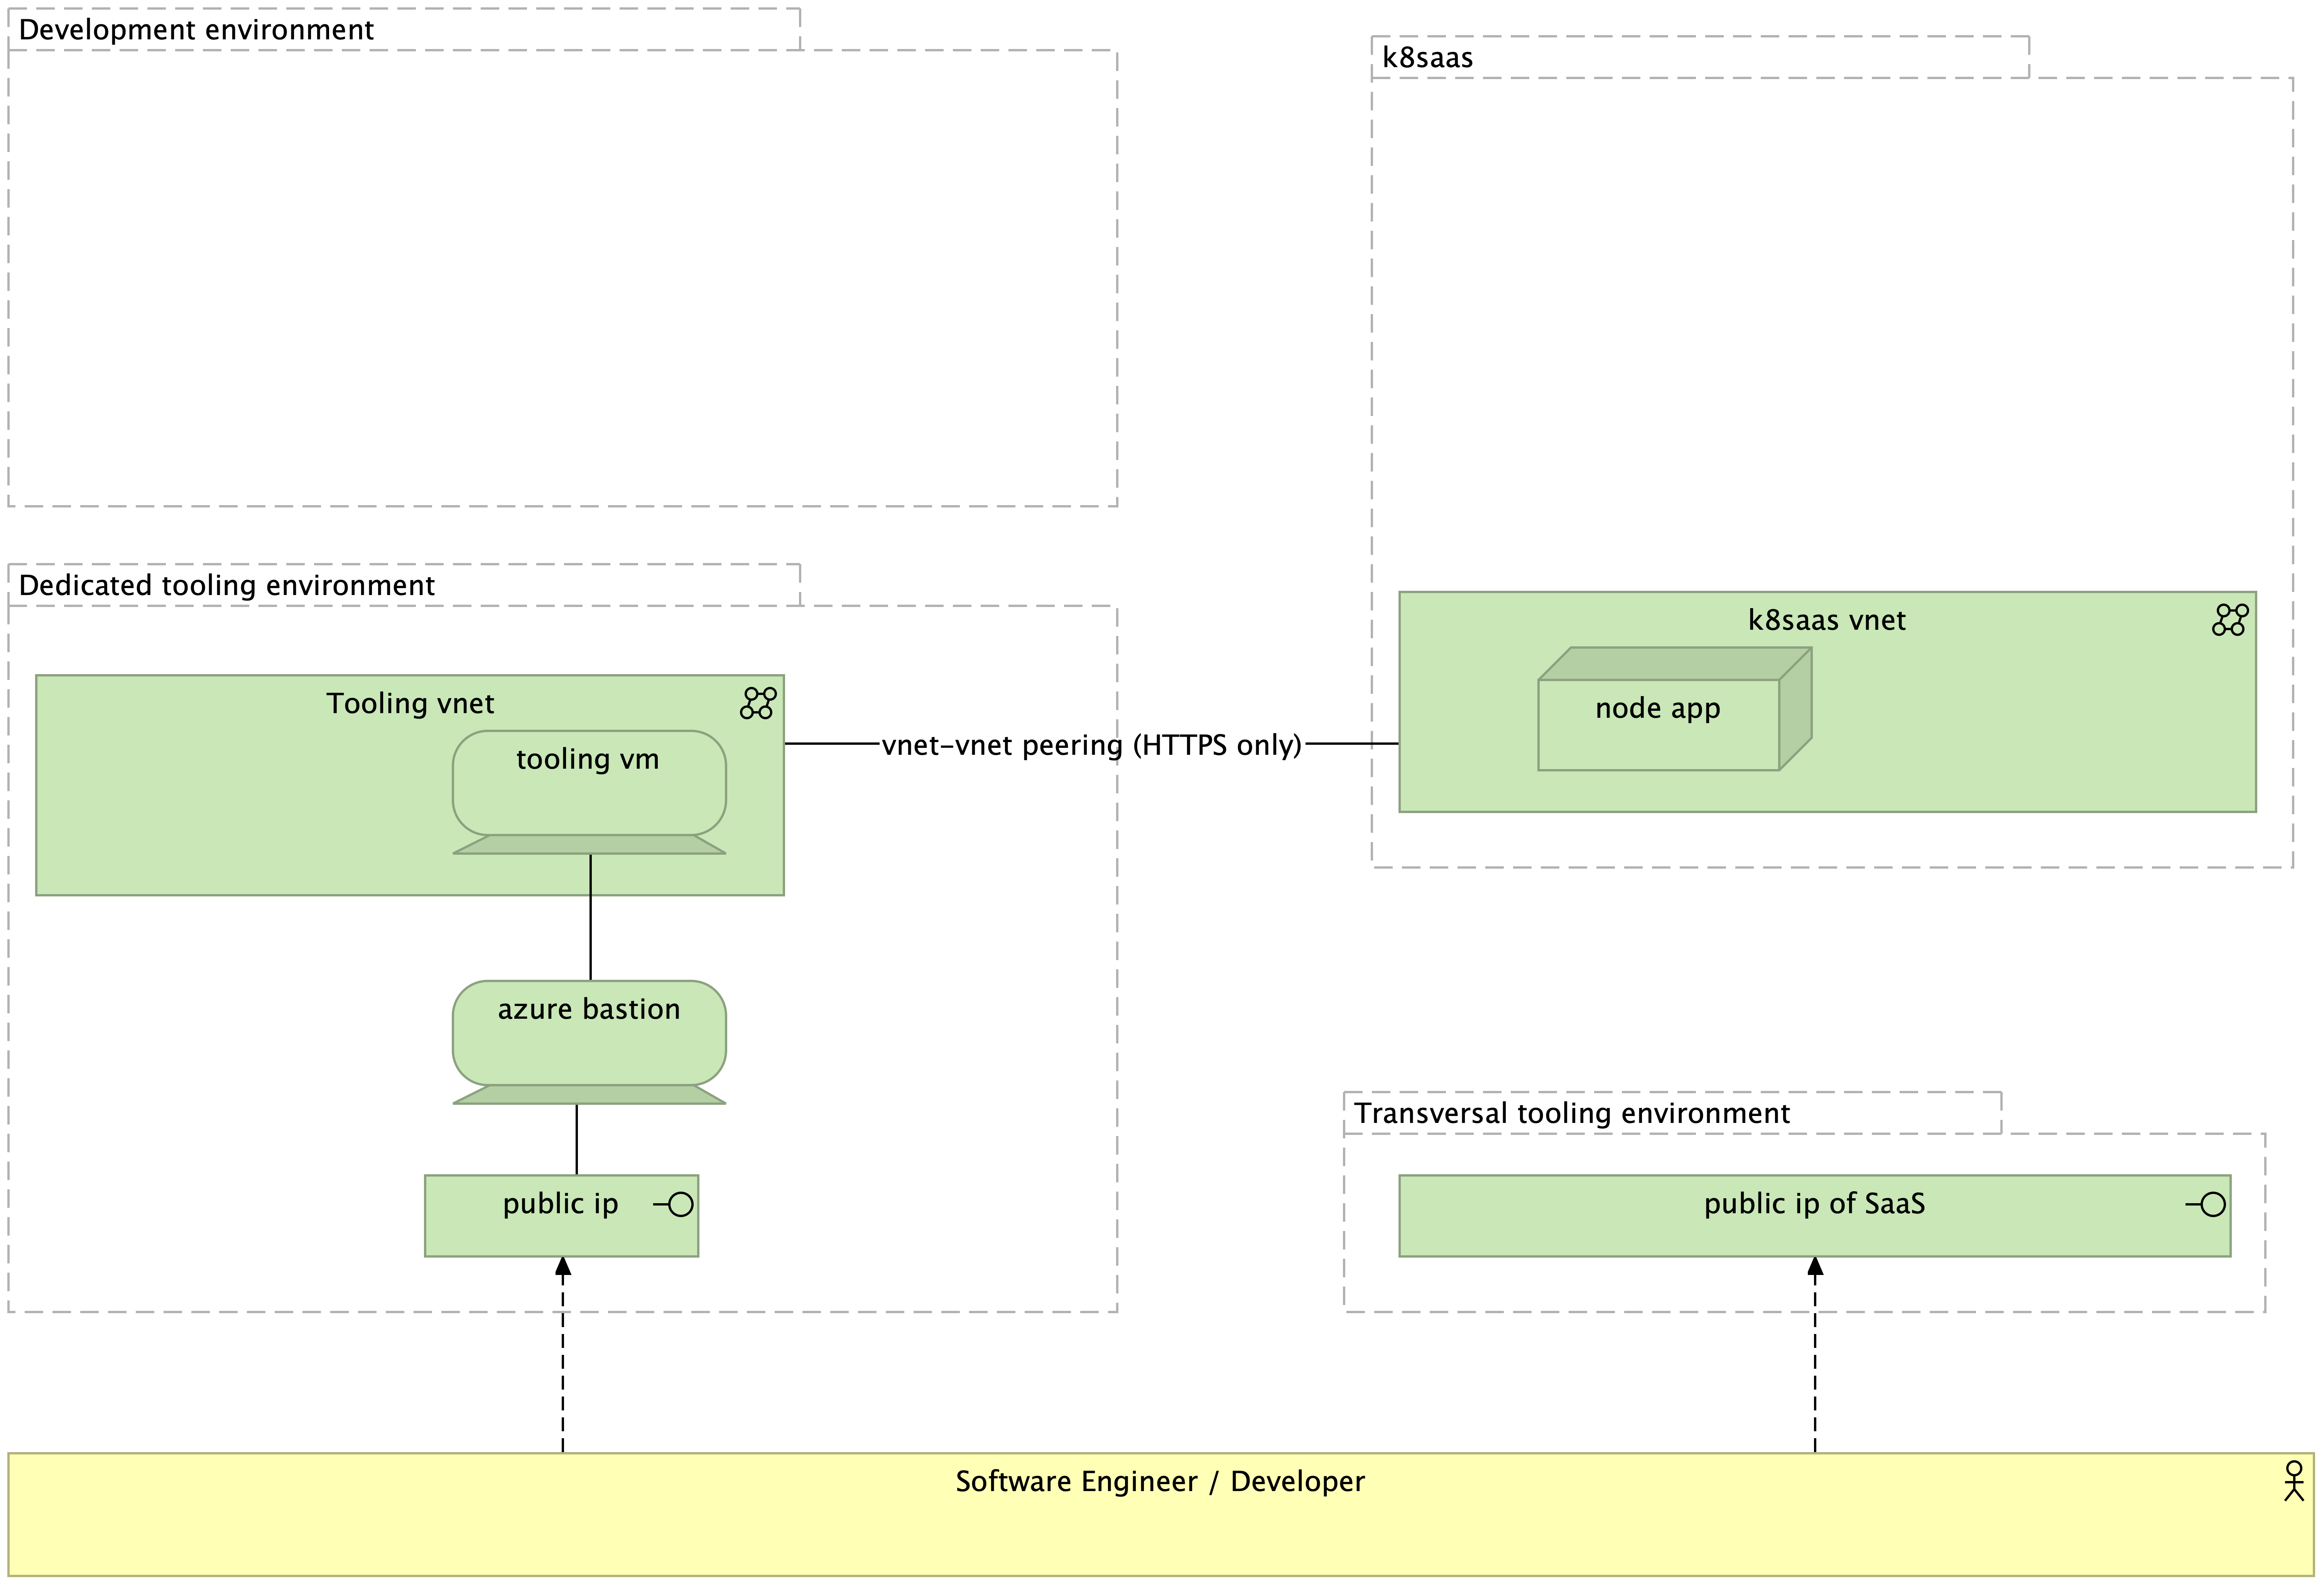
Step 1
Prerequisites
You should have:
- an azure subscription in the trustnest platform
- define a naming convention for the cloud resources
MANDATORY:
- DO NOT USE the ip ranges: 10.50.0.0/16 and 10.51.0.0/16
Note: If your infrastructure use one of the previous IP ranges, the peering between your vnet and k8saas is impossible.
Advices:
- Naming convention. We recommend to use:
<entity-name>-<project-name>-<what_you_want>-<environment>-<type_of_cloud_resource>
Tutorial
For the purpose of this tutorial, we're going to use:
- entity-name: TDS
- project-name:
training-<LETTER_OF_THE GROUP> - what_you_want:
<ID_TEAM> - environment: tooling for all transversal component, dev for the sandbox environment
Create a development resource group
- Go on "resource groups" section
- Click on "New" at the top
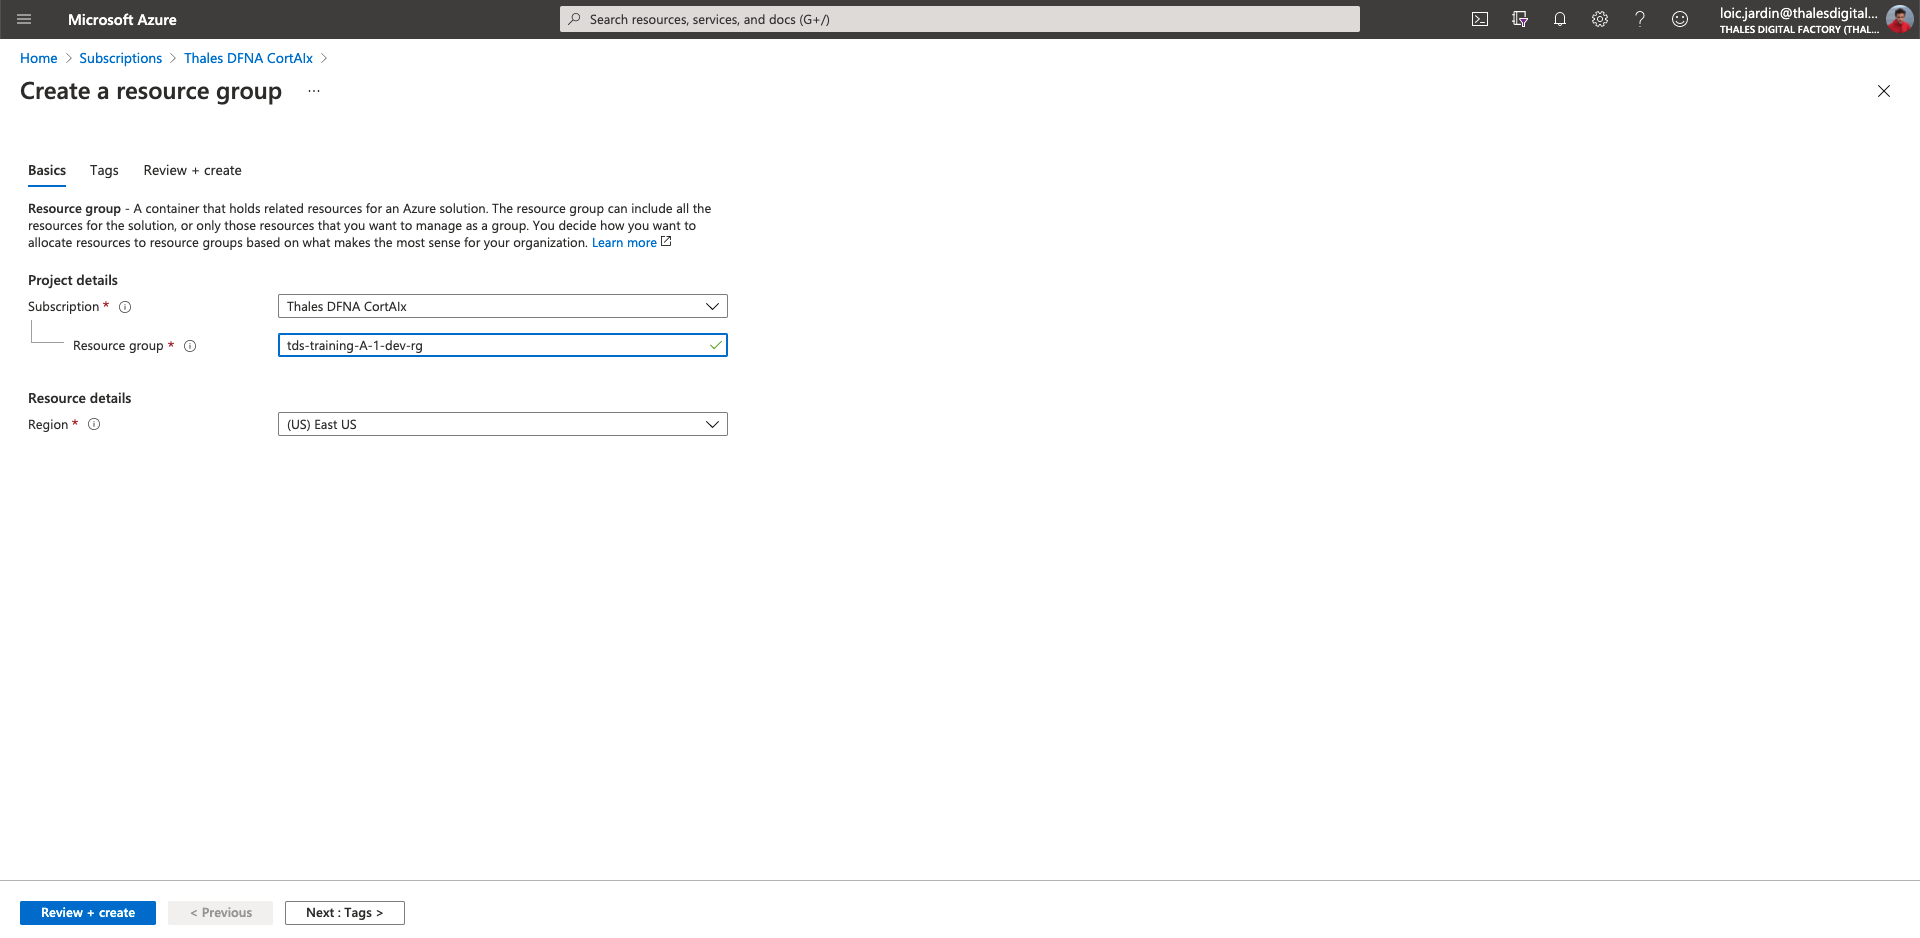
- Fill the fields with the following information
Subscription: Thales DFNA CortAIx
Resource group: tds-training-<LETTER_OF_THE GROUP>-<ID_TEAM>-dev-rg
Region: (US) East US
Like:
- then "Review + create"
- then "Create"
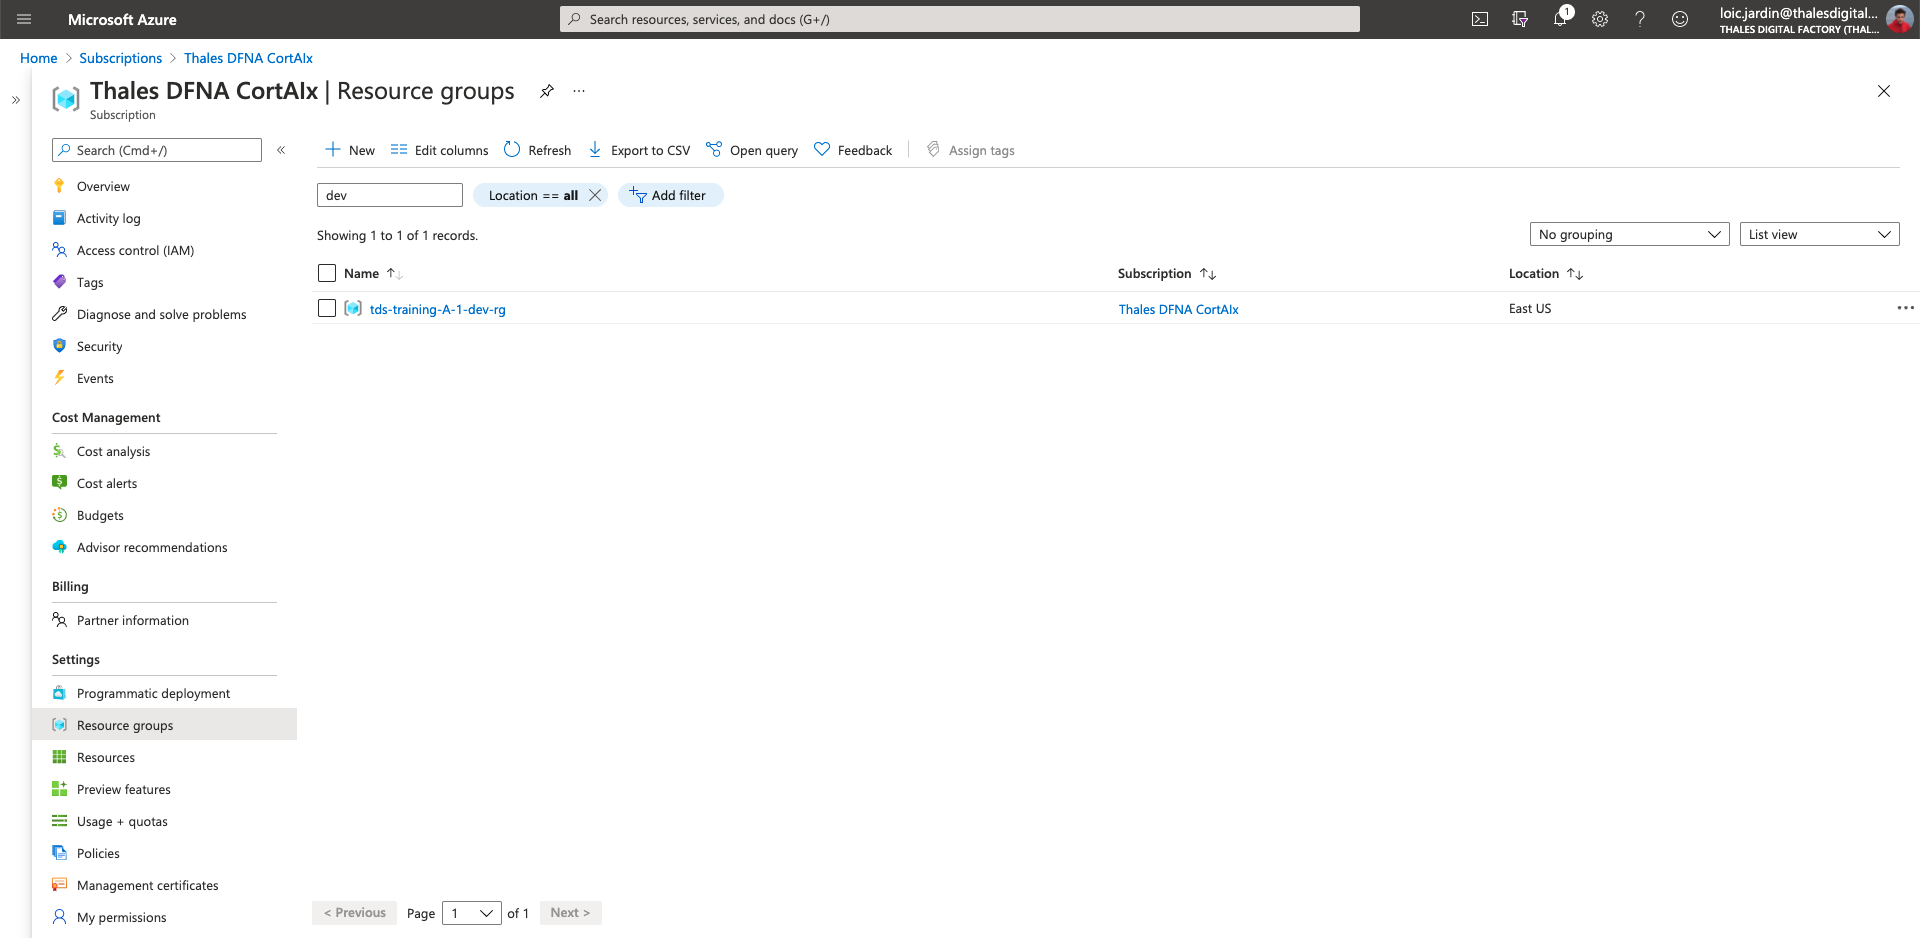
You should see your resource group now:
Create a tooling resource group
Do the same but with the name:
Resource group: tds-training-<LETTER_OF_THE GROUP>-<ID_TEAM>-tooling-rg
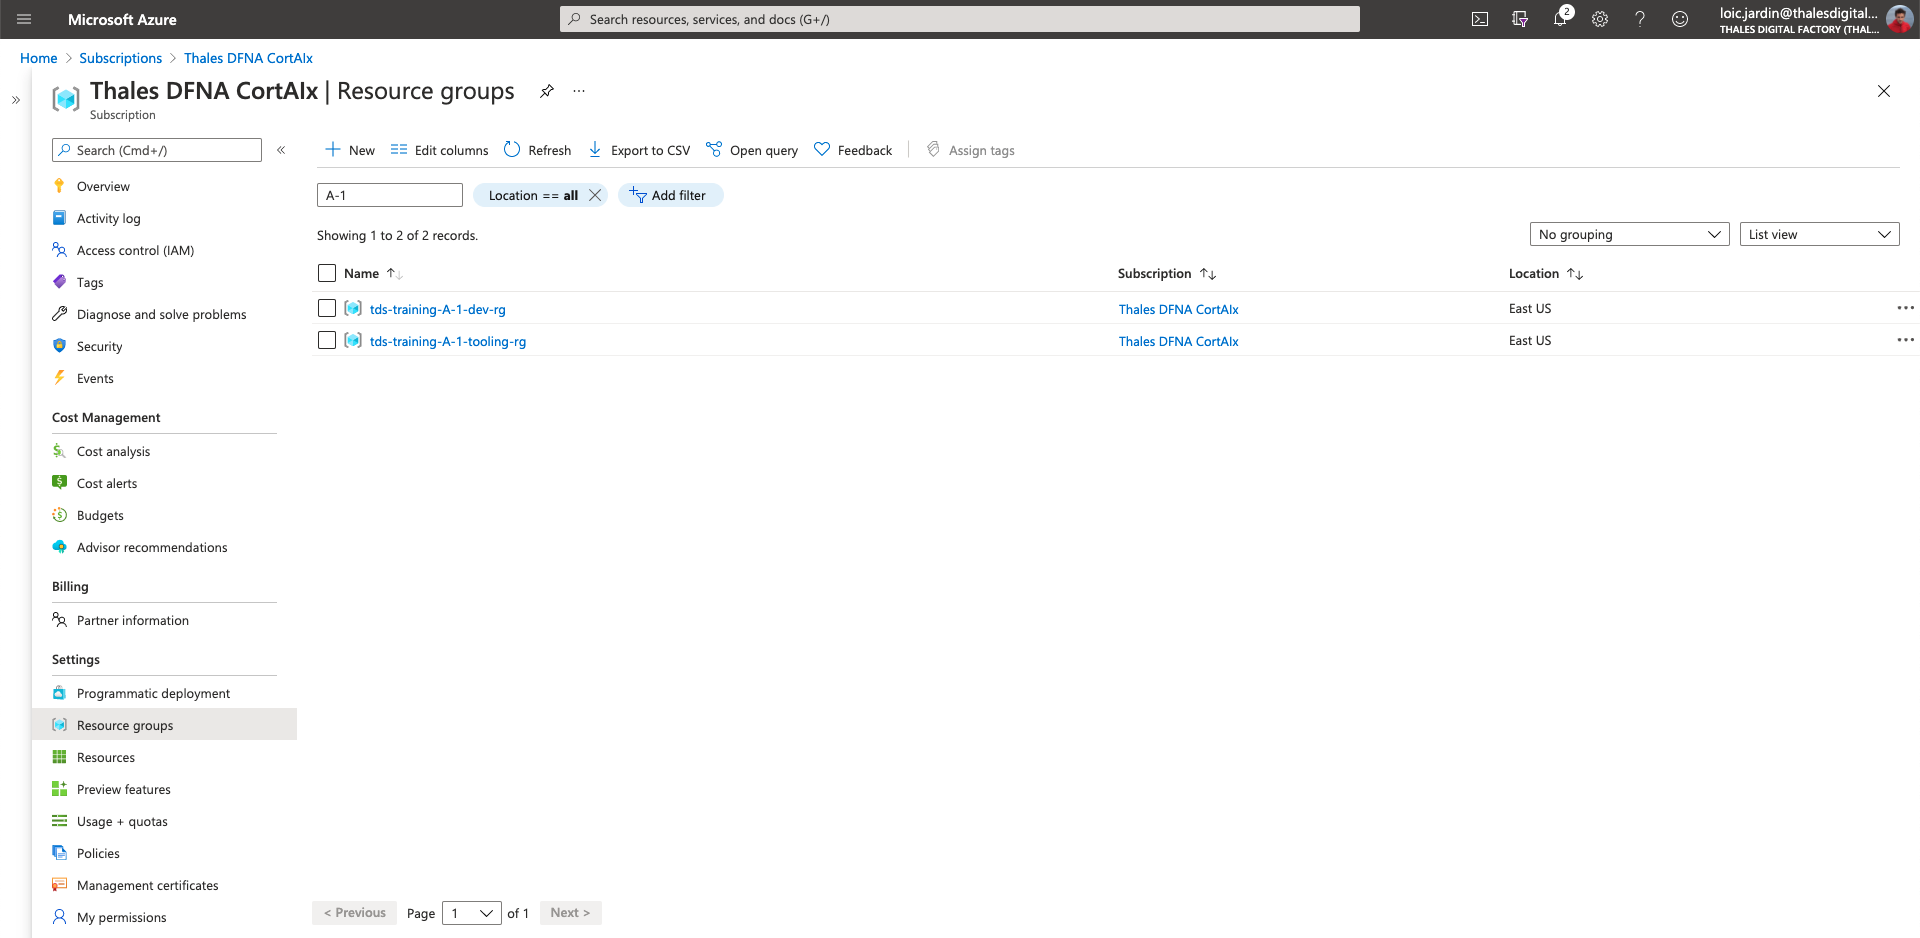
You should see:
Create a vnet / subnets / bastion
- Click on tooling resource group
- Click on "Add" at the top
- Then "marketplace"
- Search for "Virtual Network"
- Click on create
- Fill the fields with the following information
In instance details:
- Name:
tds-training-<LETTER_OF_THE GROUP>-<ID_TEAM>-tooling-vnet
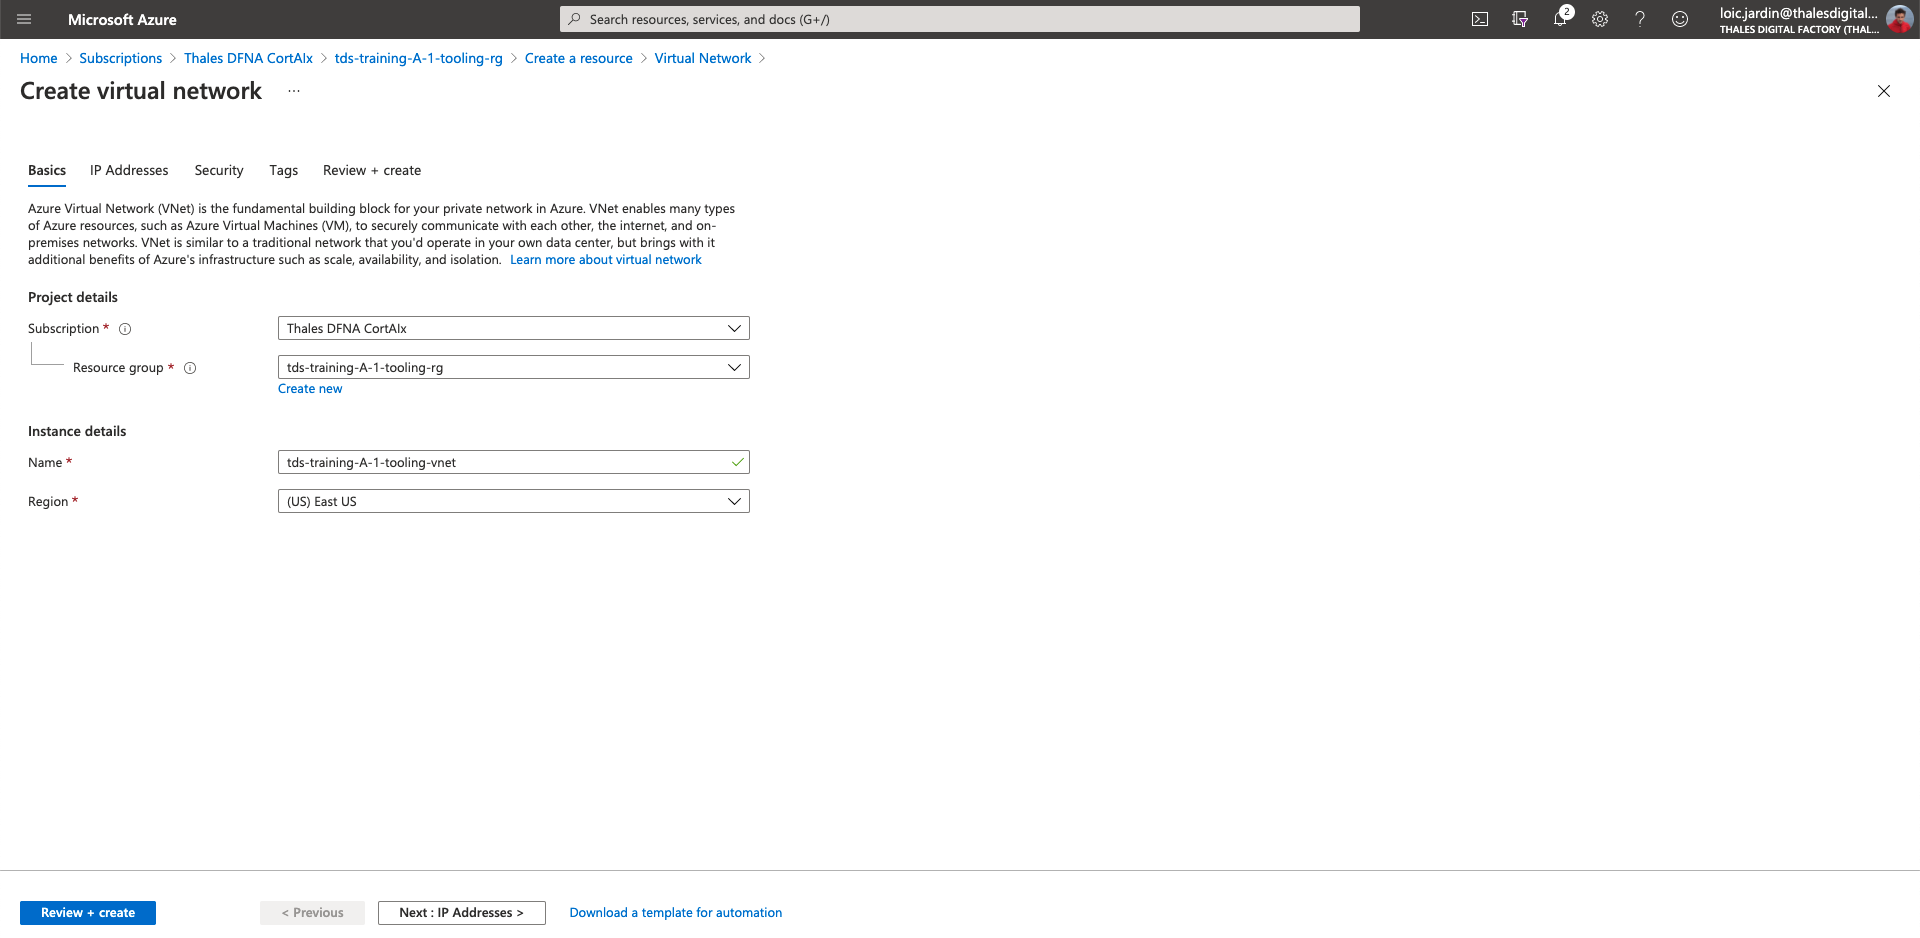
- Click on "Next: IP Addresses >"
- Remove the default IPv4 address space
- Fill with the given TDS IP range: 10.52.x.0/24
- Click on "Add subnet"
- For the second subnet:
tds-training-<LETTER_OF_THE GROUP>-<ID_TEAM>-tooling-subnet& 10.52.x.32/27
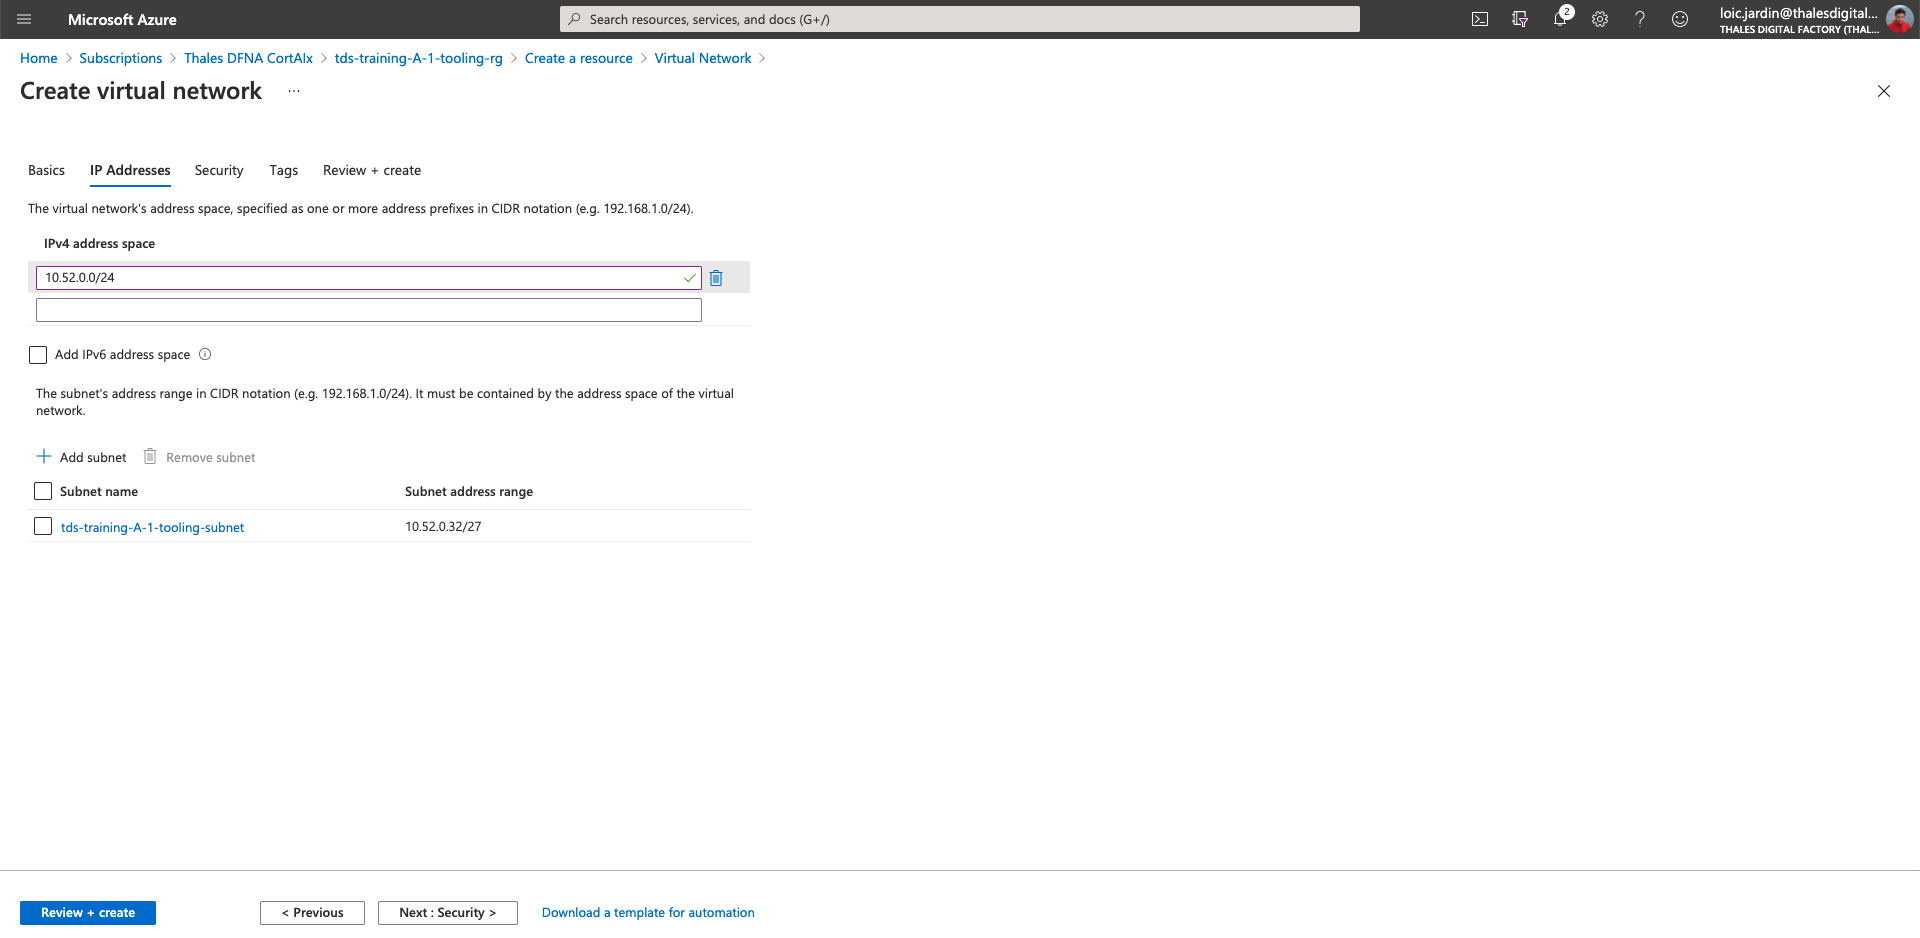
- Click on "Next: Security >"
- BastionHost: Enable
- Bastion name:
tds-training-<LETTER_OF_THE GROUP>-<ID_TEAM>-bastion - AzurebastionSubnet address space: 10.52.x.0/27
- Click on create new and fill the name:
tds-training-<LETTER_OF_THE GROUP>-<ID_TEAM>-bastion-publicip - DDoS Protection Standard: Disable
- Firewall: Disable
Note: DDoS & Firewall are expensive features.
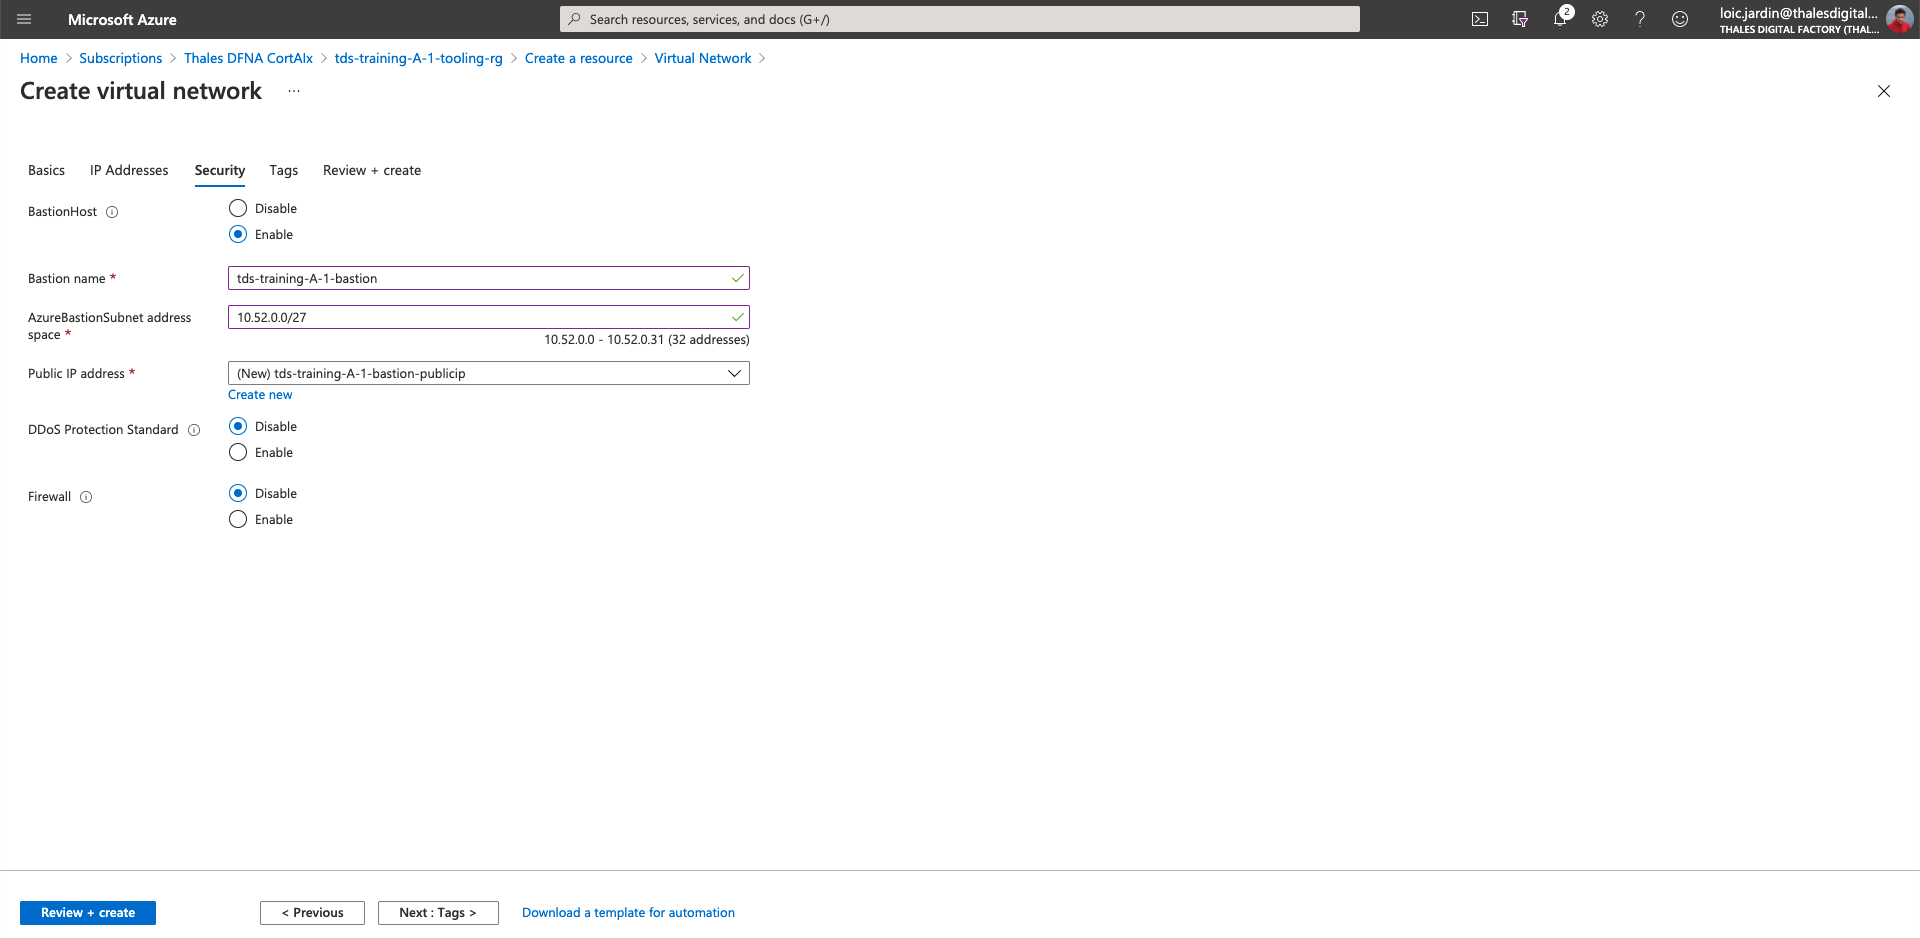
- Click on "Review + create"
- Then Create
Create a key Vault to store secrets
- Select your tooling resource group
- Click on "Add"
- Then marketplace
- Search for "Key Vault"
- Click on "create"
- Key vault name:
tds-training-<LETTER_OF_THE GROUP>-<ID_TEAM>-kv - Region: East US
- Pricing tier: Standard
- Click on "Next: Access policy"
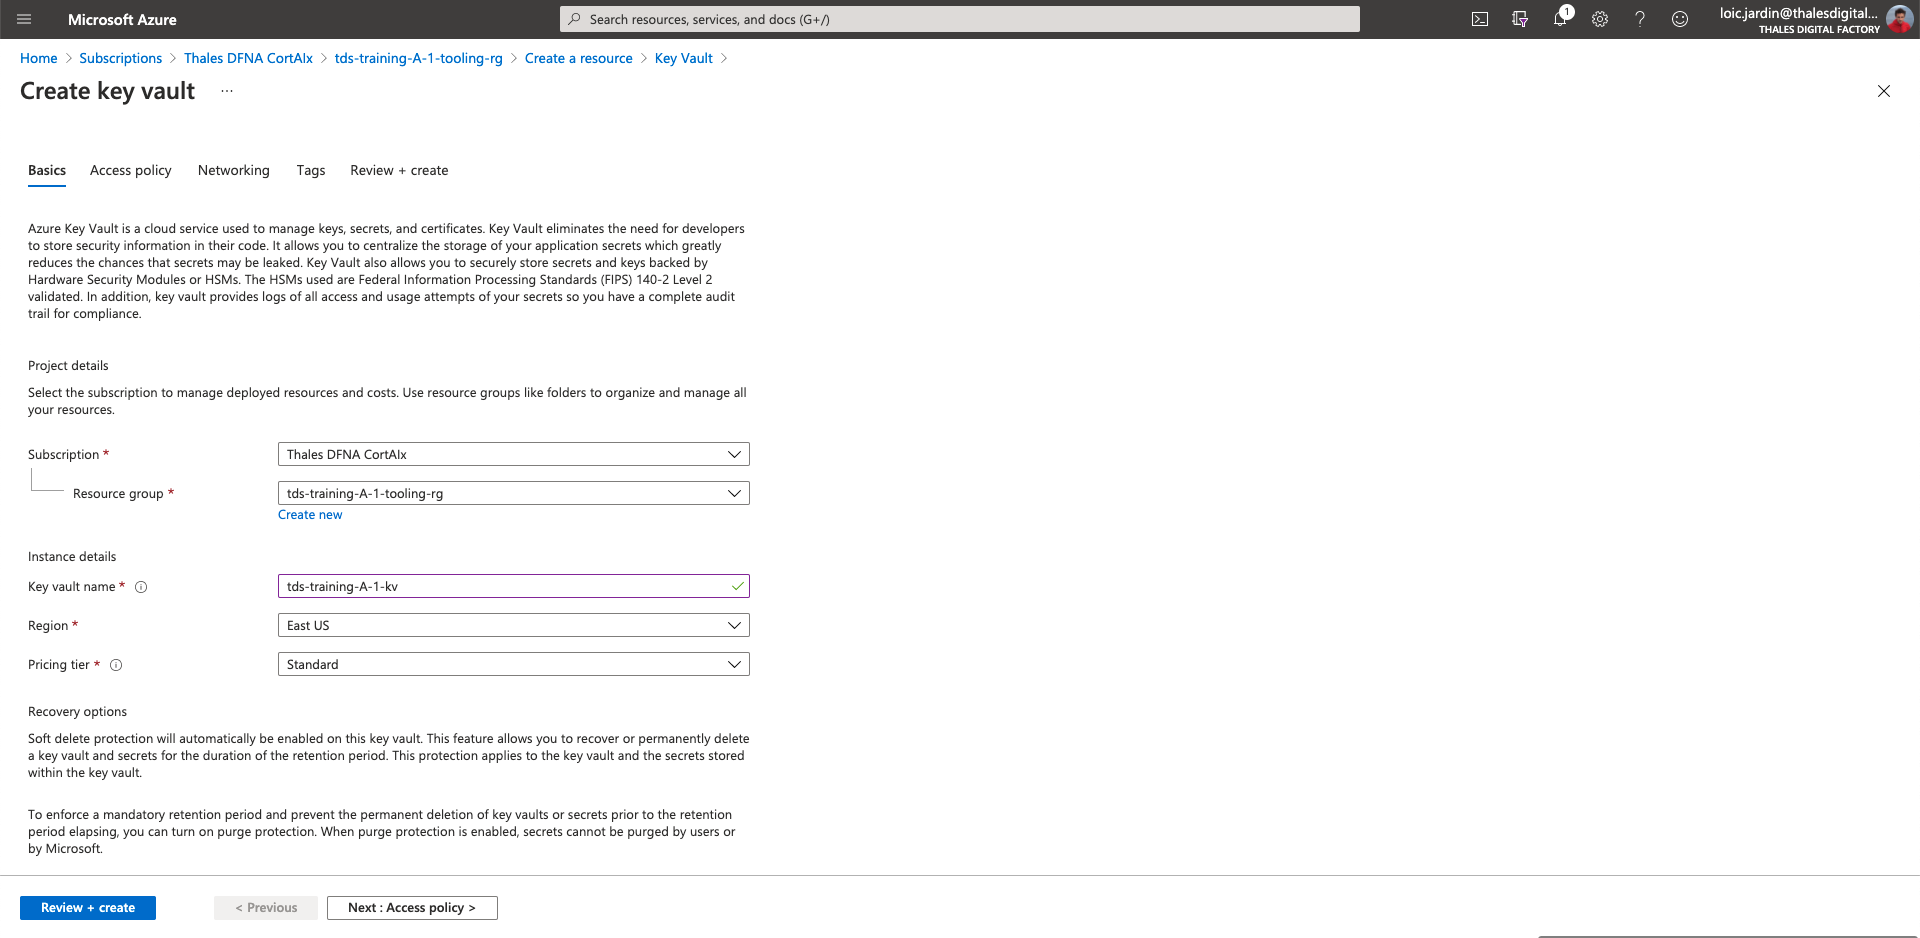
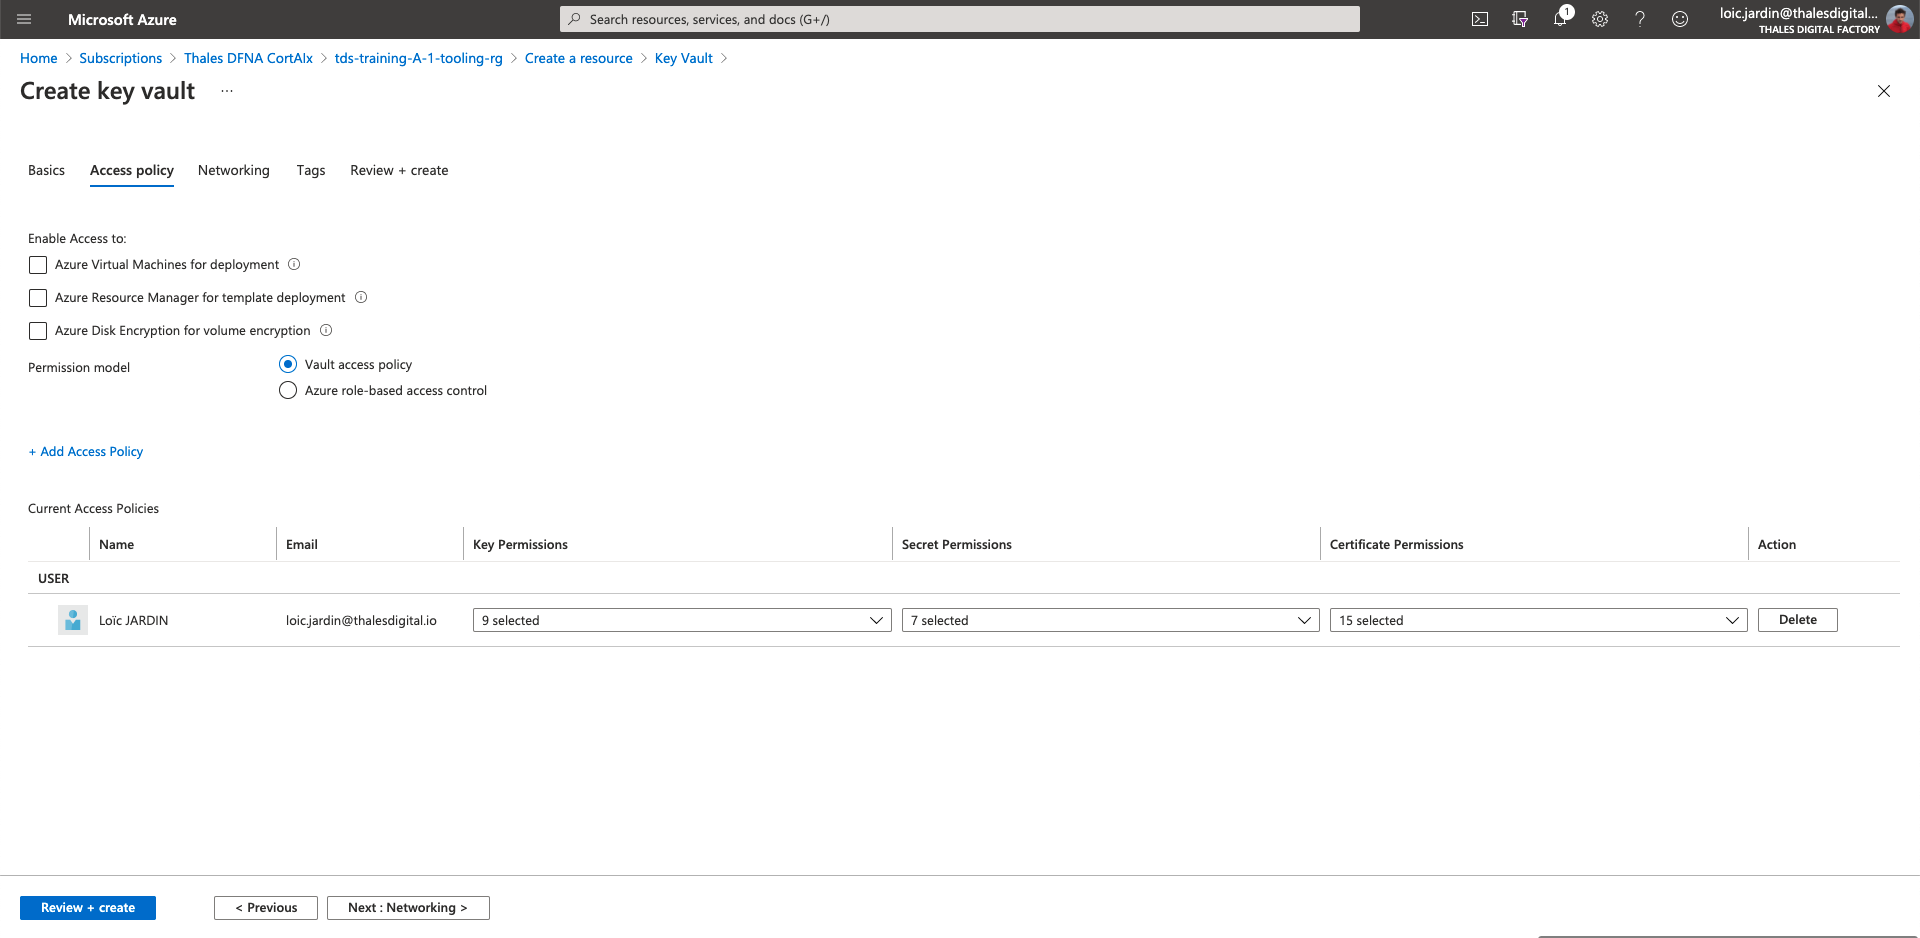
- Add the users of your team
- Click on "Review + create"
- Then "Create"
Create a virtual machine as rebound device
Go back to your resource group: tds-training-<LETTER_OF_THE GROUP>-<ID_TEAM>-tooling-rg
Note: even if the previous deployment is not finish you can continue the procedure.
- Click on "Add"
- Then "Marketplace"
- Search for "Ubuntu Server 18.04 LTS"
- Then "create"
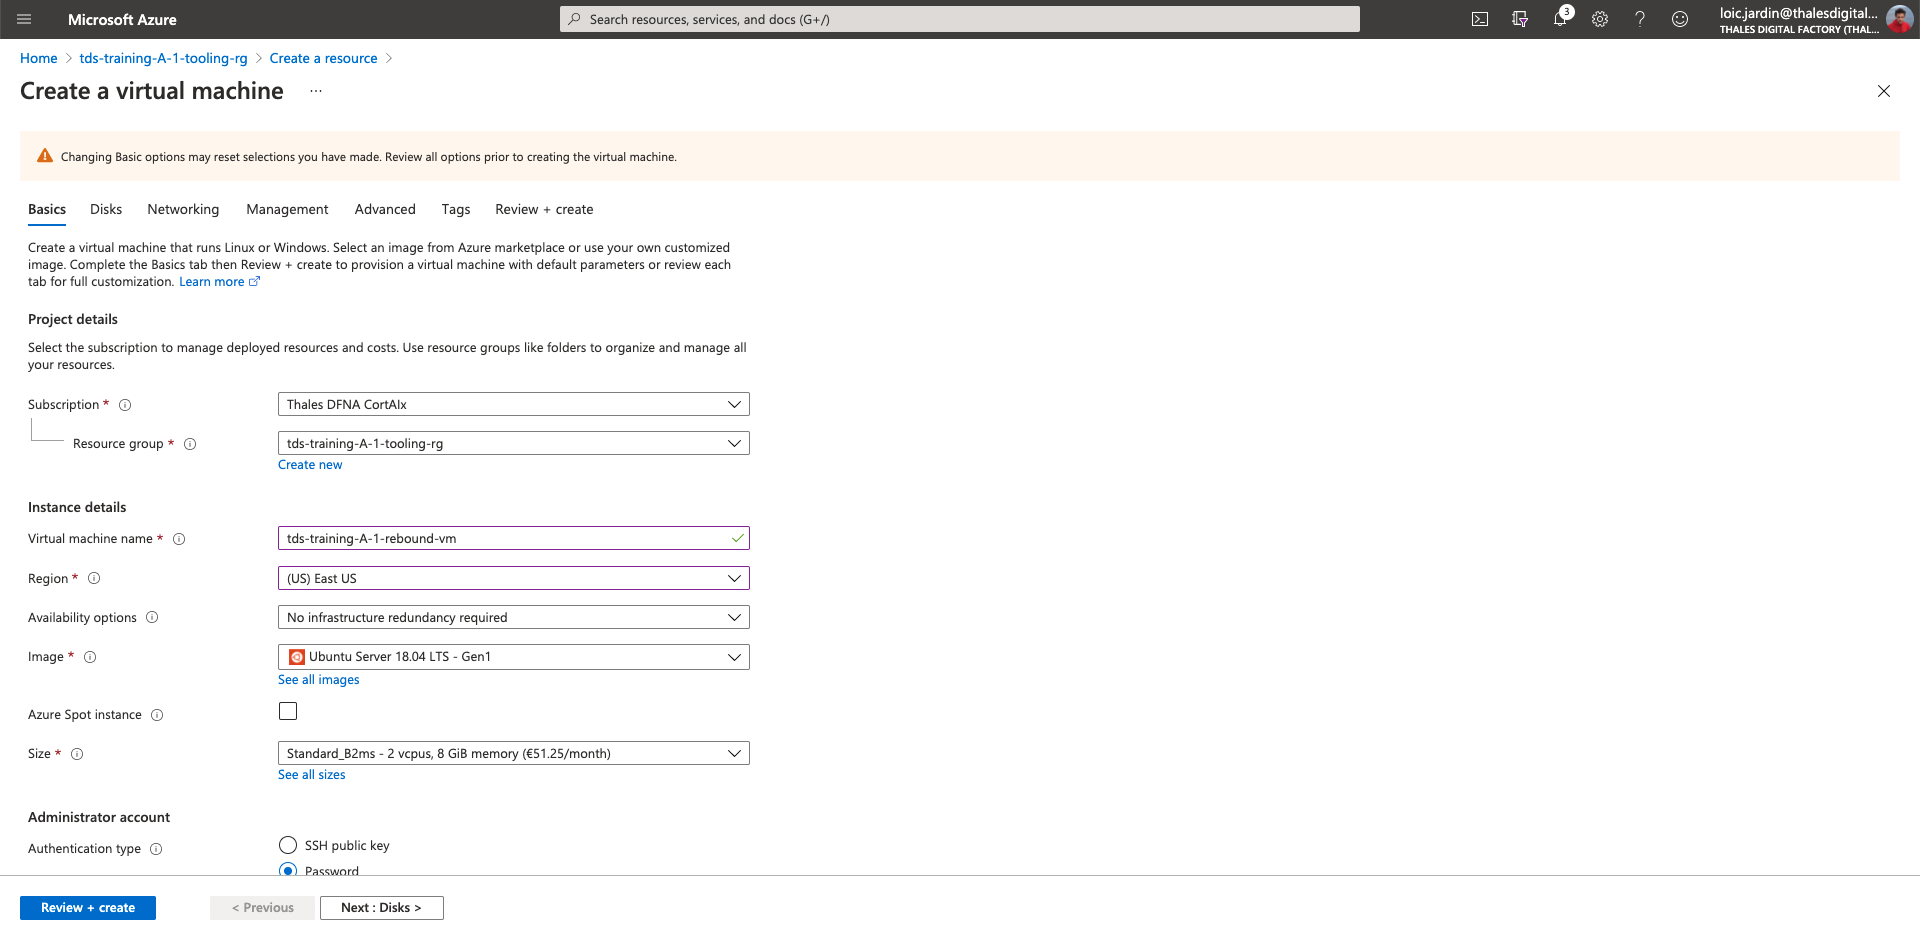
- Virtual machine name:
tds-training-<LETTER_OF_THE GROUP>-<ID_TEAM>-rebound-vm - region: (US) East US
- Availability options: No infrastructure redundancy required
- Image: Ubuntu Server 18.04 LTS - Gen1
- Size: Standard_B2ms or higher
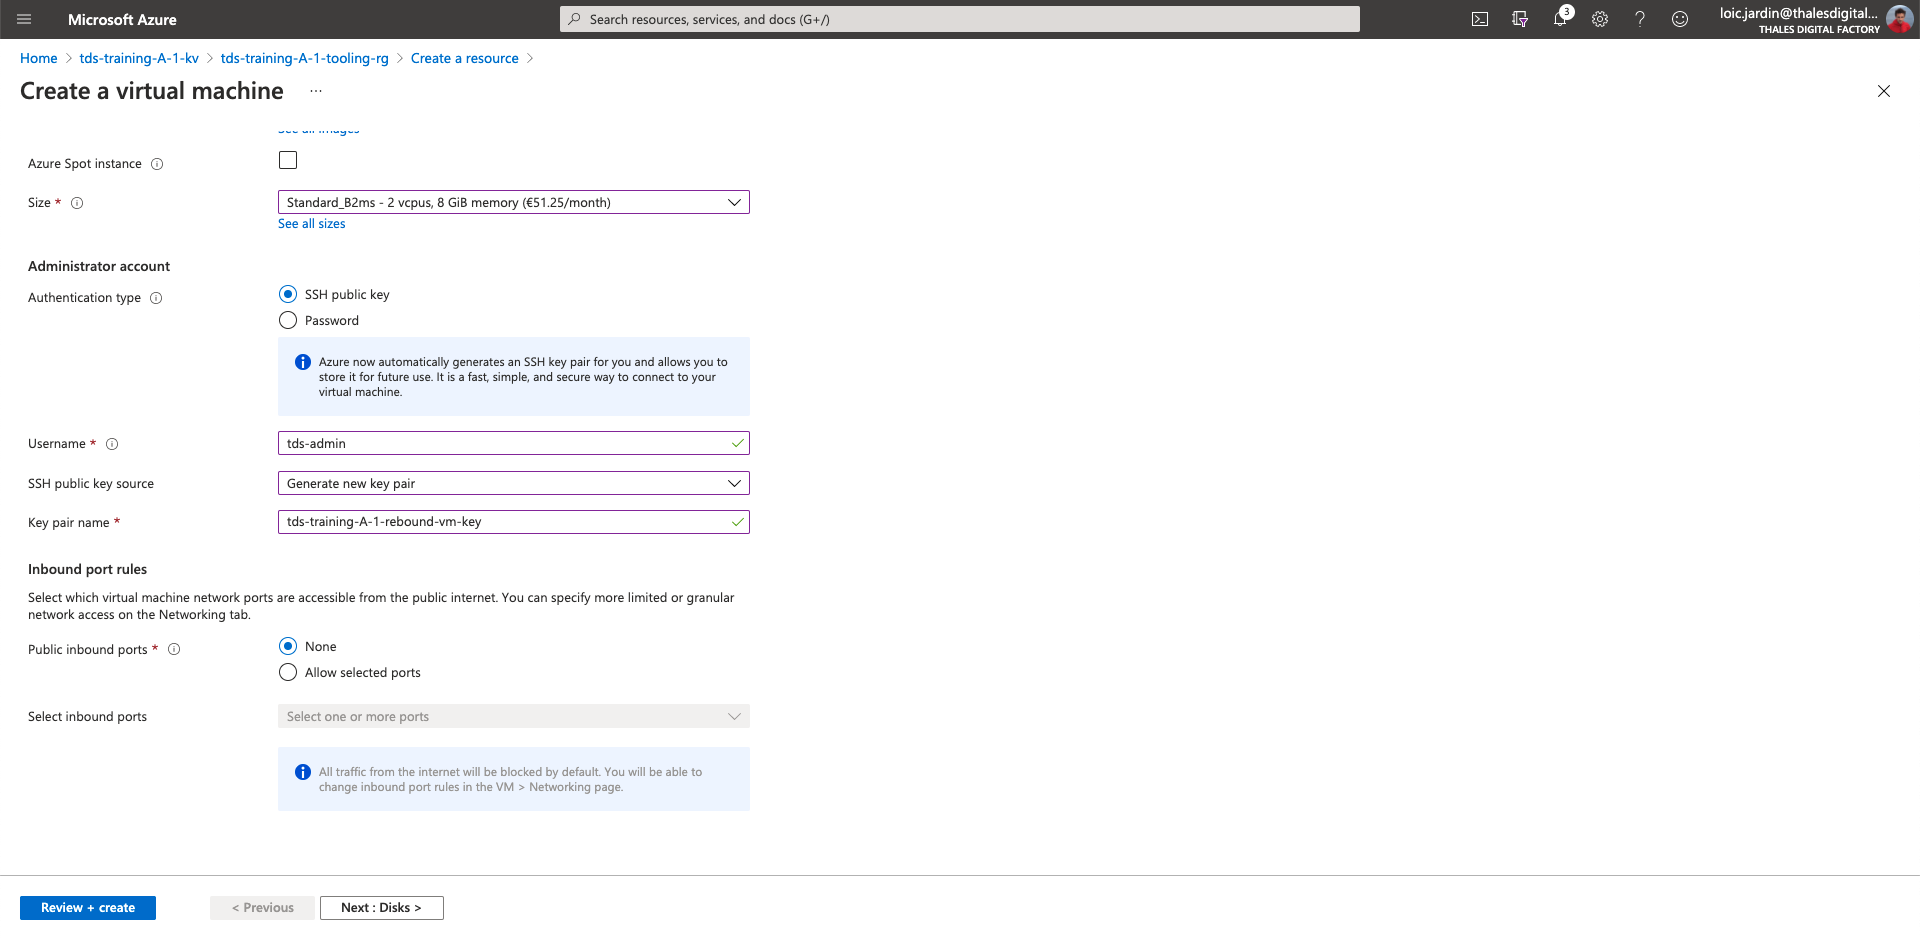
- Authentication type: SSH public key
- username: tds-admin
- SSH public key source: Generate new key pair
- Key pair name:
tds-training-<LETTER_OF_THE GROUP>-<ID_TEAM>-rebound-vm-key - Public inbound ports: None
- Click on "Next: Disk >"
- Click on "Next: Networking >"
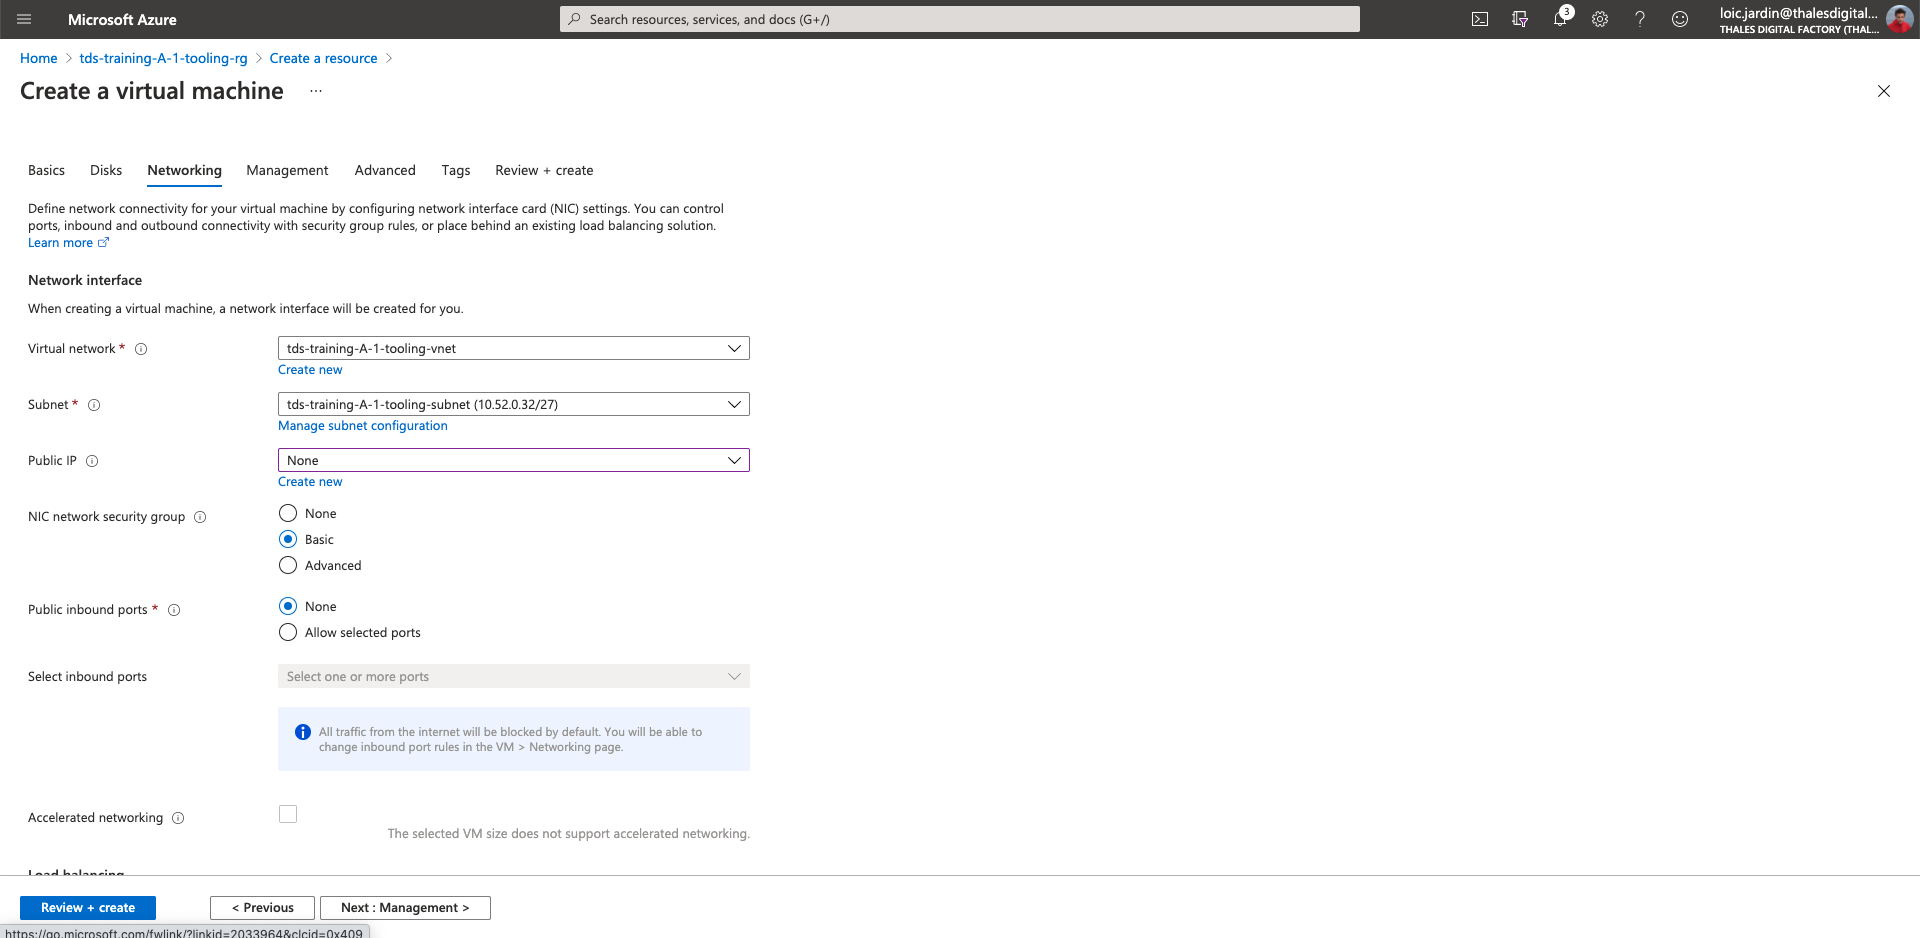
- Virtual network: Select the
tds-training-<LETTER_OF_THE GROUP>-<ID_TEAM>-tooling-vnet - Subnet: Select
tds-training-<LETTER_OF_THE GROUP>-<ID_TEAM>-tooling-subnet - Public IP: None
- NIC network security group: Basic
- Public inbound ports: None
- Click on "Review + create"
- Then create
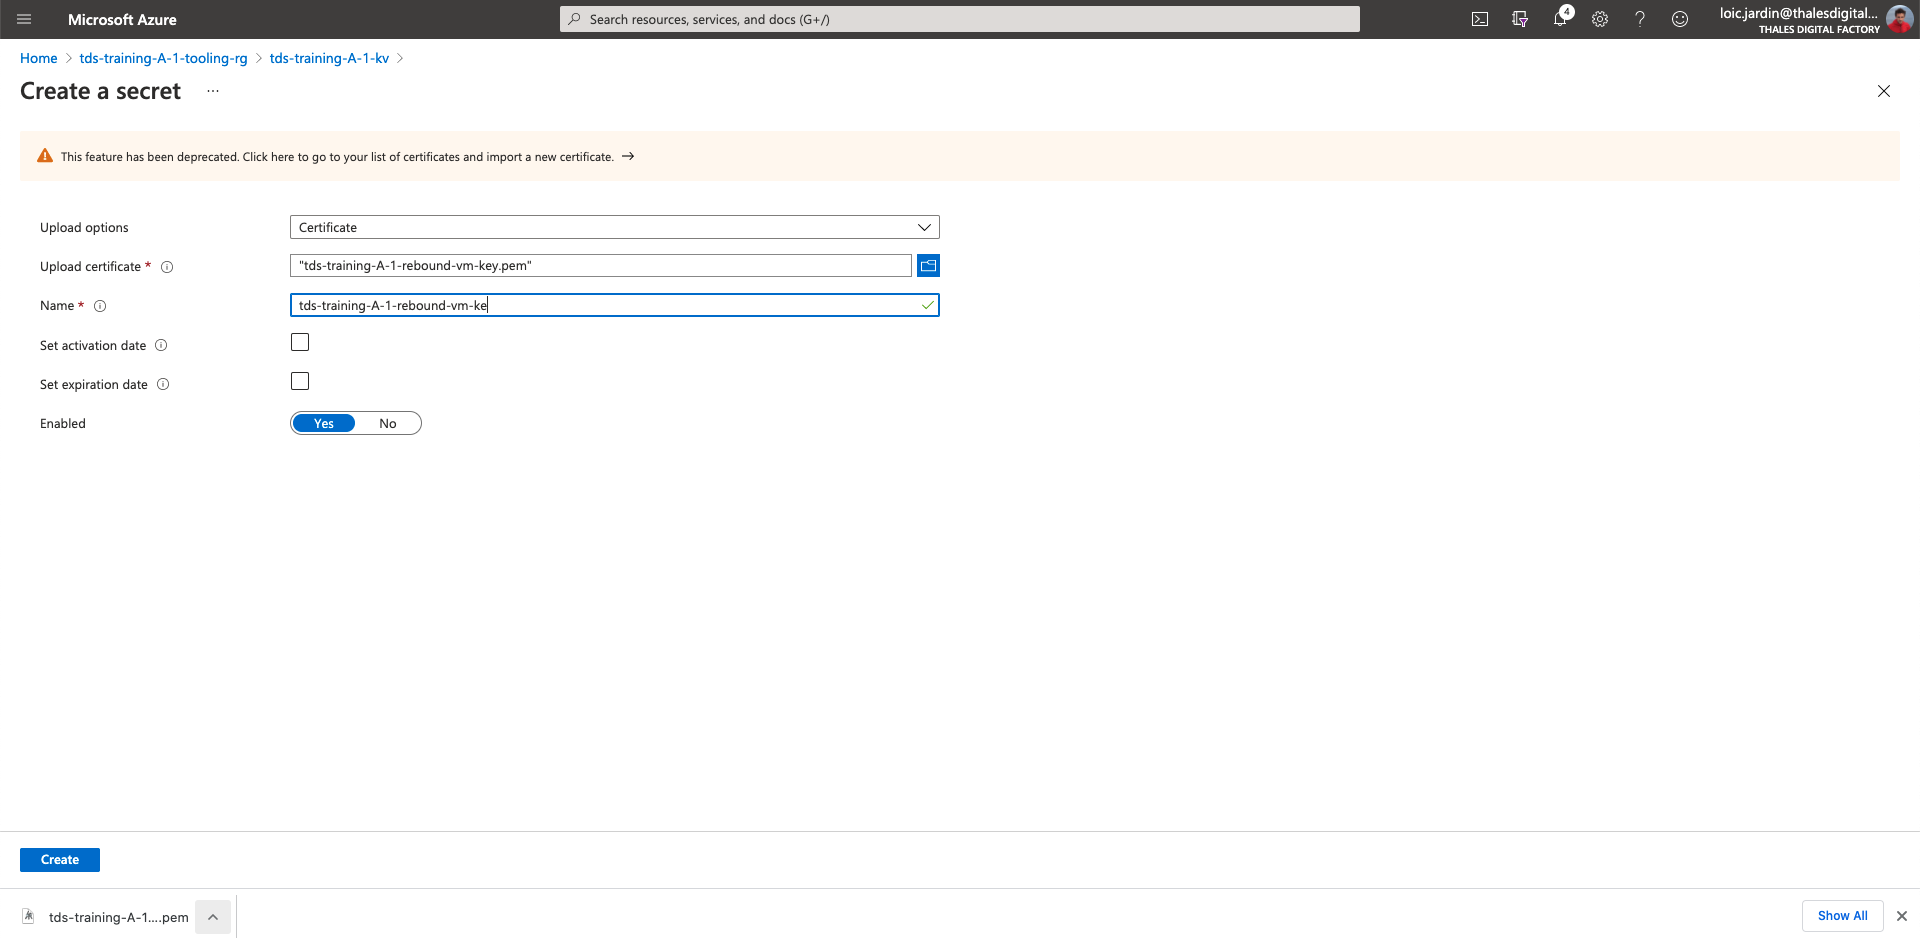
- Download the ssh private key
Add the ssh key in keyvault
- Once the ssh key download, Click on the key vault
- Then Secrets section
- Upload options: Manual
- Name
tds-training-<LETTER_OF_THE GROUP>-<ID_TEAM>-rebound-vm-key - Value: VALUE OF THE SSH PRIVATE KEY
Note 1: the ssh private key should look like:
-----BEGIN RSA ...
SOME_TEXT
-----END RSA ...
Note 2: Do not use Certificate. It does not work with azure bastion
- Click on "Create"
Test your bastion access
- Once the vm is deployed, click on "go to resource"
- Click on "Connect" at the top
- Then Bastion
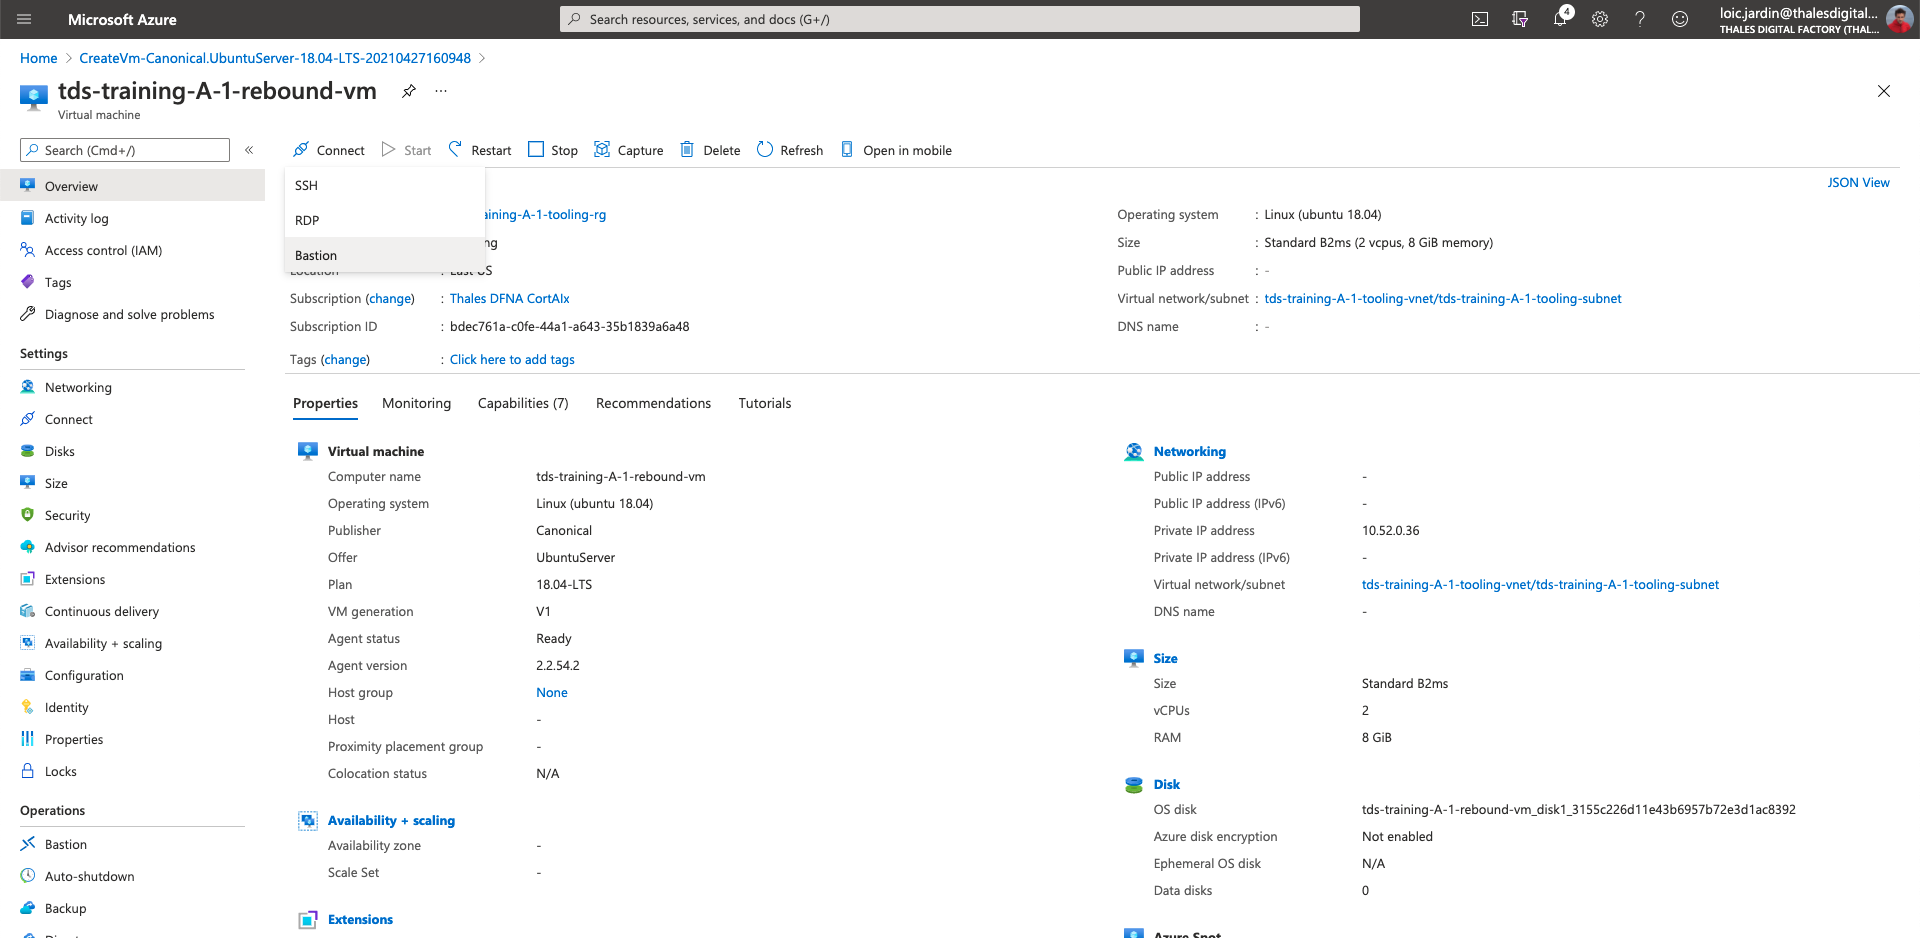
- CLick on "Use Bastion"
- Username: tds-admin
- Authentication Type: SSH Private Key from Azure Key Vault
- Then select you azure key vault secret
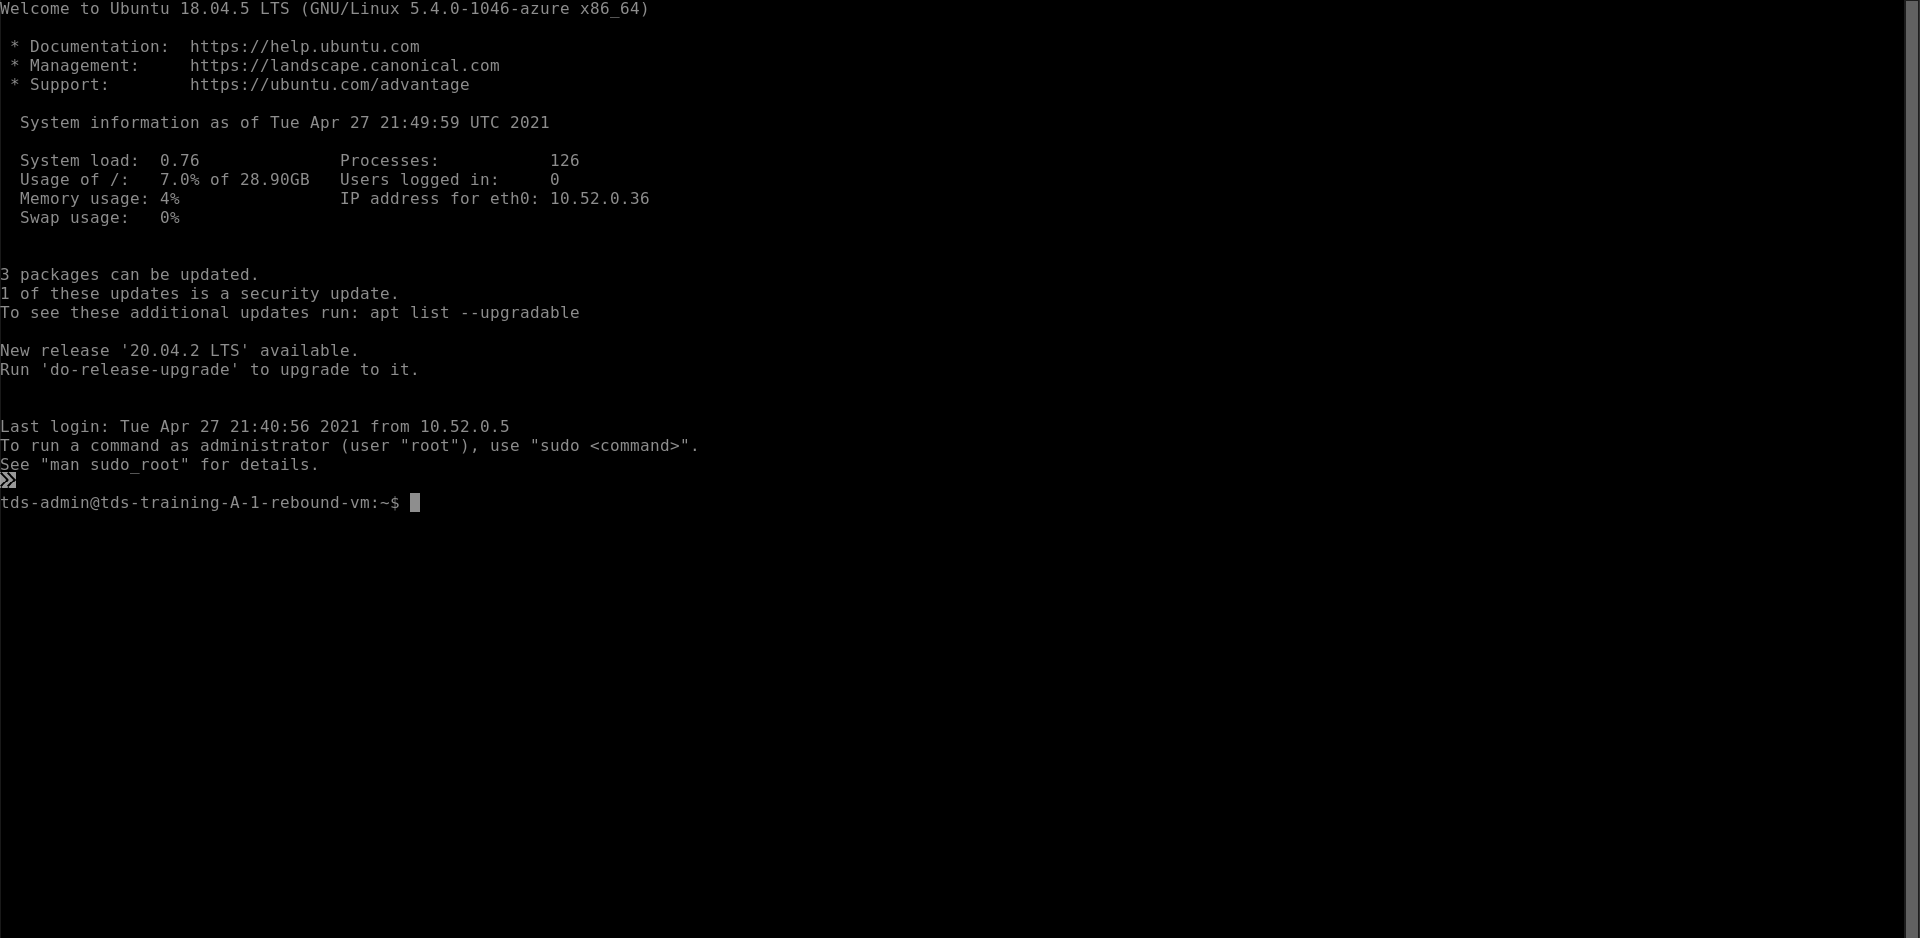
- Click on "connect"
- TADA your connected to the rebound-vm
Step 2
Prerequisites
Please look at the getting started doc to get the credentials.
Deploy your first hello world application
git clone https://gitlab.thalesdigital.io/platform-team-canada/k8saas-innersource/hello-world-k8saas.git
cd hello-world-k8saas/Basic-helloworld
Look at the first file: aks-helloworld-one.yaml
apiVersion: apps/v1
kind: Deployment
metadata:
  name: aks-helloworld-one
spec:
  replicas: 1
  selector:
    matchLabels:
      app: aks-helloworld-one
  template:
    metadata:
      labels:
        app: aks-helloworld-one
    spec:
      containers:
      - name: aks-helloworld-one
        image: mcr.microsoft.com/azuredocs/aks-helloworld:v1
        ports:
        - containerPort: 80
        env:
        - name: TITLE
          value: "Welcome to Azure Kubernetes Service (AKS)"
---
apiVersion: v1
kind: Service
metadata:
  name: aks-helloworld-one
spec:
  type: ClusterIP
  ports:
  - port: 80
  selector:
    app: aks-helloworld-one
This file is composed of:
- a kubernetes deployment which contains a pod: aks-helloworld-one based on a microsoft image: mcr.microsoft.com/azuredocs/aks-helloworld:v1
- a kubernetes service that exposes the previous container internally
Deploy this file:
$ kubectl apply -f aks-helloworld-one.yaml
deployment.apps/aks-helloworld-one created
service/aks-helloworld-one created
Expose your application using an ingress
Then, look at the second file: hello-world-ingress.yaml
Update the following lines:
- line 6: use the nginx-internal class. It will expose your application using an internal proxy (mandatory before the gotodemo gate)
- line 11 & 14: update the url to use this pattern
hello-world-ingress.tds-training-<LETTER_OF_THE GROUP>-<ID_TEAM>.kaas.thalesdigital.io
The file should looks like:
apiVersion: networking.k8s.io/v1
kind: Ingress
metadata:
  name: hello-world-ingress
  annotations:
    cert-manager.io/cluster-issuer: letsencrypt-staging
spec:
  ingressClassName: nginx-internal
  tls:
  - hosts:
    - hello-world-ingress.tds-training-<LETTER_OF_THE GROUP>-<ID_TEAM>.kaas.thalesdigital.io
    secretName: tls-secret
  rules:
  - host: hello-world-ingress.tds-training-<LETTER_OF_THE GROUP>-<ID_TEAM>.kaas.thalesdigital.io
    http:
      paths:
      - path: /
        pathType: Prefix
        backend:
          service:
            name: aks-helloworld-one
            port:
              number: 80
Once the file modify:
$ kubectl apply -f hello-world-ingress.yaml
ingress.networking.k8s.io/hello-world-ingress created

# all look at the ingress
$ kubectl get ingress -w
Warning: extensions/v1beta1 Ingress is deprecated in v1.14+, unavailable in v1.22+; use networking.k8s.io/v1 Ingress
NAME                  CLASS    HOSTS                                                        ADDRESS   PORTS     AGE
hello-world-ingress   <none>   hello-world-ingress.tds-training-a-1.kaas.thalesdigital.io             80, 443   12s
hello-world-ingress   <none>   hello-world-ingress.tds-training-a-1.kaas.thalesdigital.io   10.50.5.66   80, 443   12s
TADA ! Your application is exposed on HTTPS using a generated certificate (not valid because using letencrypt-staging. Use letencrypt-prod to get a valid certificate)
Let test few command:
$ nslookup hello-world-ingress.tds-training-a-1.kaas.thalesdigital.io
Server:  192.168.2.1
Address: 192.168.2.1#53

Non-authoritative answer:
Name: hello-world-ingress.tds-training-a-1.kaas.thalesdigital.io
Address: 10.50.5.66
The domain is public. The ip is in our private k8saas range 10.50.0.0/16
If you test to access to the url using your browser, it will not work because the ip is not public. Again: it's mandatory before the gotodemo gate.
Access to your application using rebound VM
Please ask for a peering between the tooling-vnet of your project and the tds-training-sandbox k8saas cluster.
What to do ?
- Please, go to the TrustNest K8SaaS Service catalog with the following information:
- asking for peering
- precise the name of the k8saas cluster your want to peer
- precise : subscription, resource_group, vnet name to be peered
- Add
romain.meunier.c@thalesdigital.io; richard.bonnette@thalesdigital.io; loic.jardin@thalesdigital.ioas Network Contributor to your vnet.
Note 1: only HTTPS is allowed by default. Note 2: Once the peering done, you can remote the Network Contributor roles of the vnet
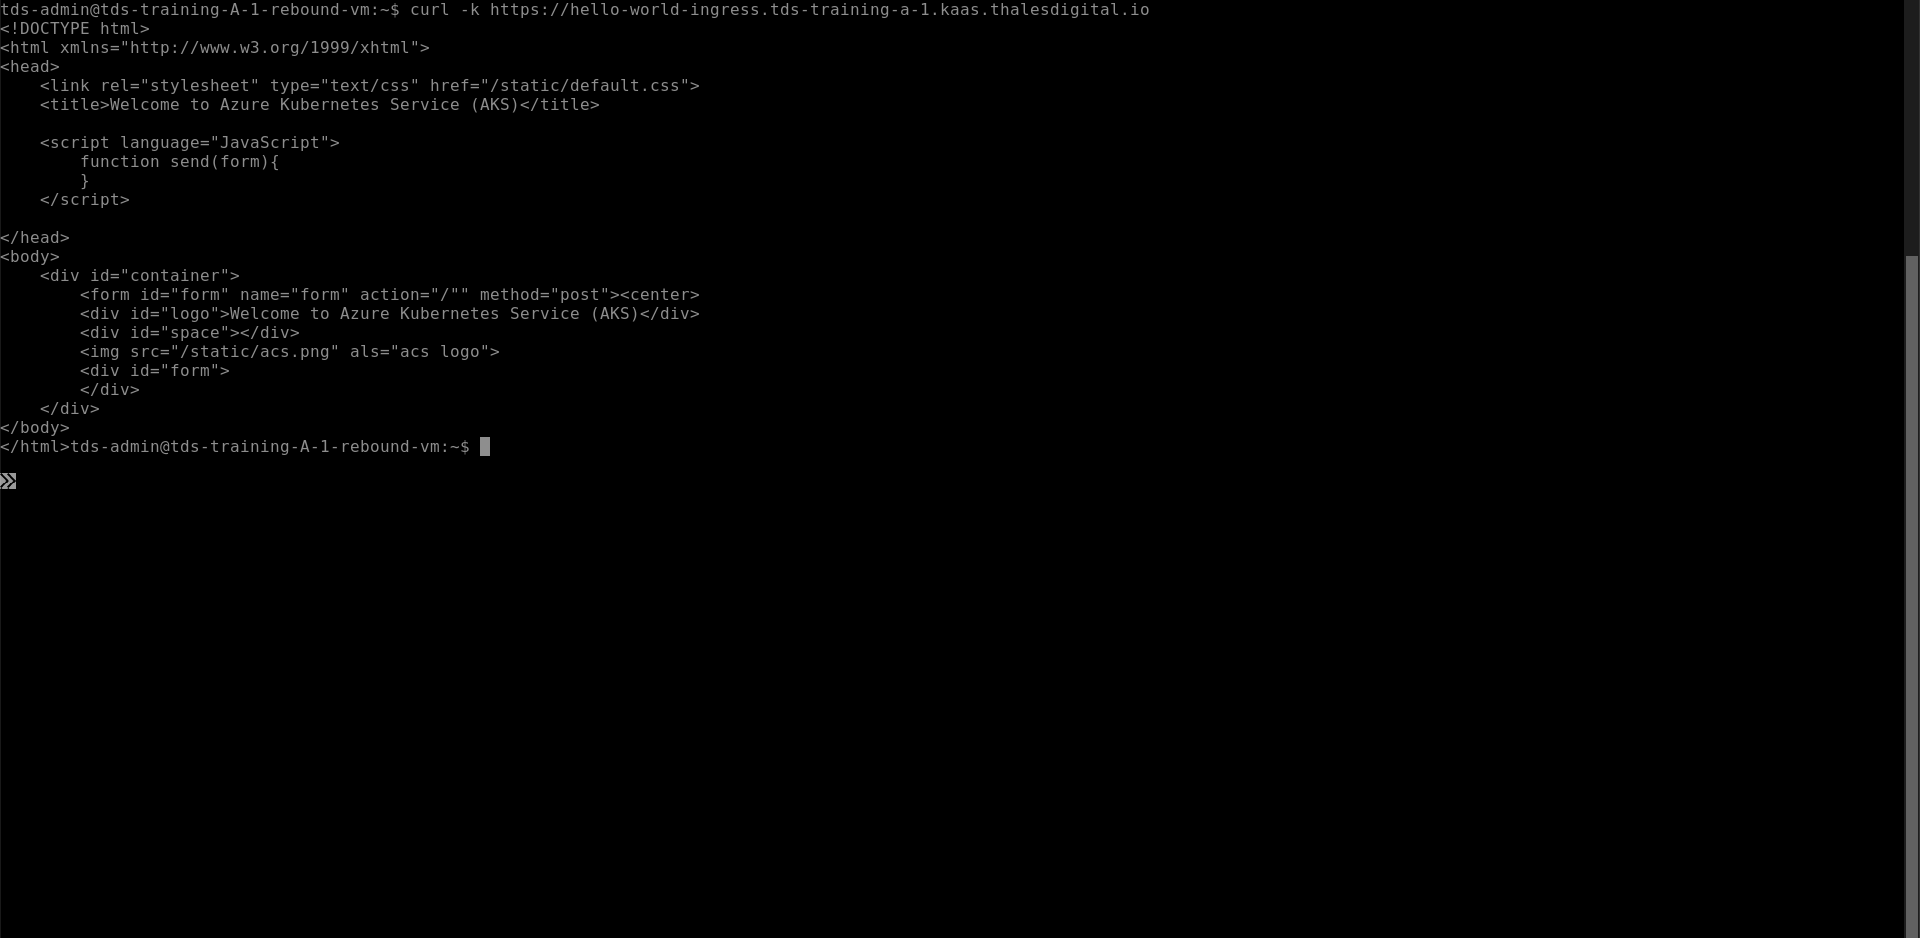
Now, go back to the rebound-vm using the bastion, and try to access to url
curl -k https://hello-world-ingress.tds-training-<LETTER_OF_THE GROUP>-<ID_TEAM>.kaas.thalesdigital.io
You should have:
Next Steps
- Deploy an application using an azure managed database