HOW TO install and operate Warp10
Context
Warp10 is one of the most Advanced Time Series Platform.
If you are already a user of k8saas, you may need to install Warp10 on your cluster to benefit from Time Series Engine.
The purpose of this documentation is to explain how to easily deploy Warp10 on your k8saas cluster.
Architecture

Prerequisites
- Have at least a k8saas Innovate Service Offer. If not, ask for a cluster
- Have devops rights on the k8saas cluster
Install Warp10
We use the container way to deploy Warp10 in our K8SAAS pltaftorm, so to do that we use the official builds on docker hub : https://hub.docker.com/r/warp10io/warp10
The deployment of warp10 is based on helm charts, here the link to the community repo : https://gitlab.thalesdigital.io/platform-team-canada/k8saas-innersource/community/warp10
To deploy it:
- fork the project in the trustnest gitlab
- add the KUBE_CONFIG_SANDBOX variable with a ci/cd kubeconfig (doc to get it here) to settings / CI/CD / Variables
- TODO: DOMAIN_NAME
HOWTO
Generate a token
In order to push, get, and update data we have to get a token for our running Warp10 image. The above commands allow to generate a new token.
Add sudo to the container (optional if already done)
kubectl exec --stdin --tty -n customer-namespaces pod-name -- apk --no-cache add sudo
Generate a token as warp10 user with the app name "test" and set the ttl (ms)
kubectl exec --stdin --tty -n customer-namespaces pod-name -- sudo -u warp10 warp10-standalone.sh worf app-name 31536000000
Manipulating data via API
It's possible to write and get data via API, below is an example of sending data :
curl \
  -H "X-Warp10-Token: Write_TOKEN" \
  -H "Transfer-Encoding: chunked" \
  -T data-file.gts \
  'https://warp10.<DOMAIN_NAME>.kaas.thalesdigital.io/api/v0/update'
You should receive an HTTP 200 response.
Use WarpStudio Dashboard
At the install step, we need to add our warp instance in the settings of the portal.
Just clic on the + icon and add the warp 10 instance, in our case it is https://warp10.<DOMAIN_NAME>.kaas.thalesdigital.io/api/v0
Now we can use the warp Studio dashboard to manipule data instead using curl.
The Sandbox portal is available here : https://warp10.<DOMAIN_NAME>.kaas.thalesdigital.io/
Download the data in the Geo Time Series input format and load the file using the Browse button on https://warp10.<DOMAIN_NAME>.kaas.thalesdigital.io/#/update
Set your write token and click "Update" at the bottom at the page.
Tutorial
Deploy Covid Tracker using Warp10
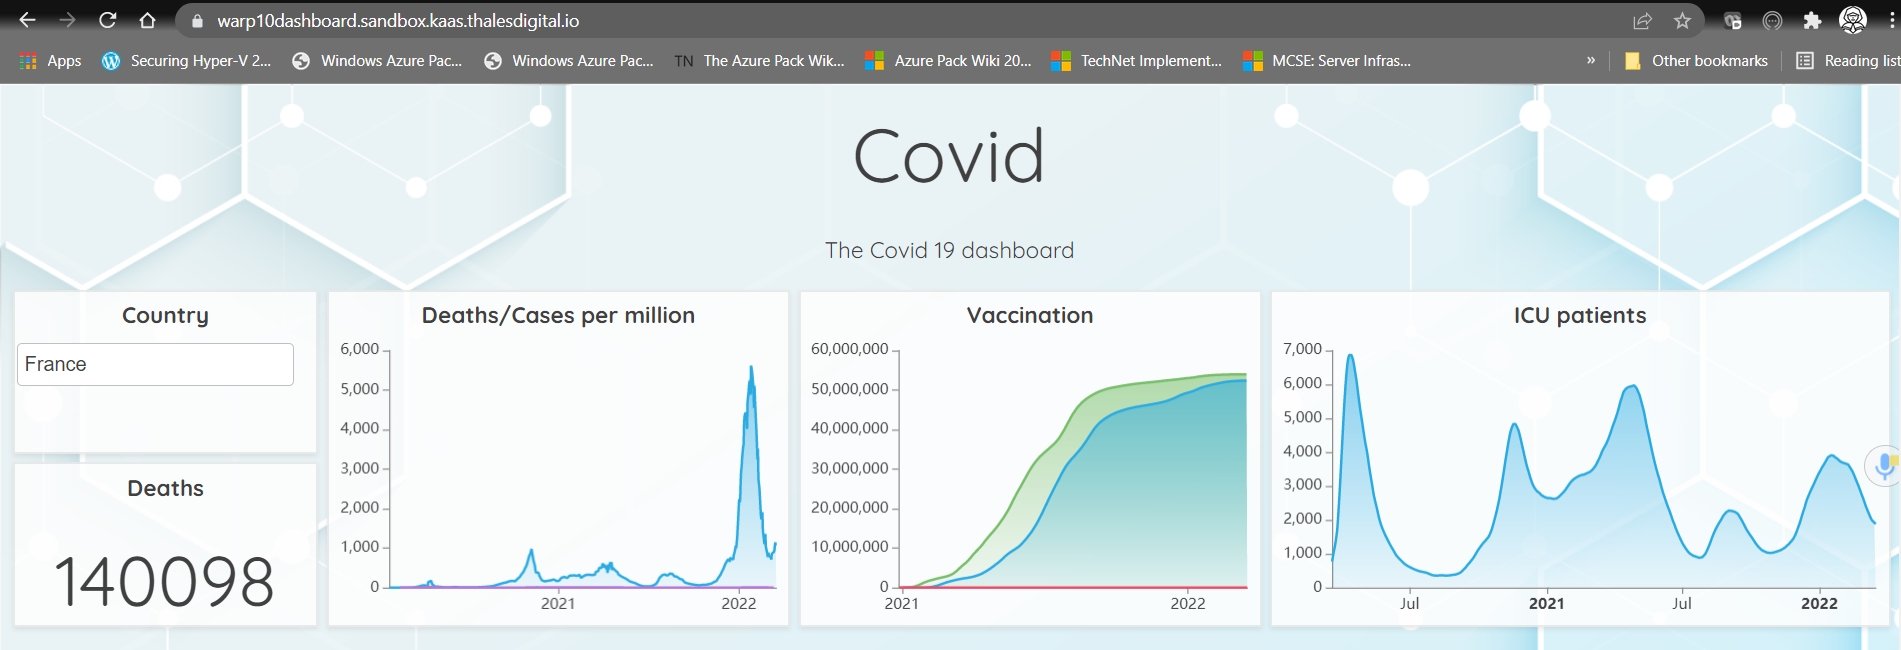
K8SAAS enabling Team has integrated a deployment example to illustrate how warp10 works. To begin with, look at the innersource project here: repository
The HTML that will deployed, is a covid tracker dashboard that retreives informations using dashboard discovery from the Warp10 api deployed on a K8S cluster. To know more about the covid tracker deployment on warp10 side, please see this repository.
Rebuild the demonstration on your own
An innersource project is available: here
The project consists on a simple ci/cd pipeline:
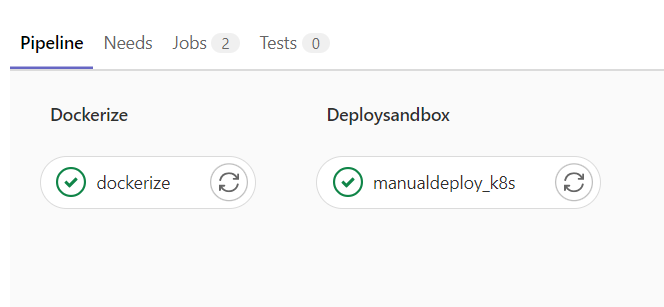
with 2 steps:
- Dockerize
- manualdeploy_k8s
Dockerize:
This job is used to build a nginx docker image based on the following Dockerfile.
FROM nginx
EXPOSE 80
COPY index.html /usr/share/nginx/html
Then it puts the resulting docker image in Artifactory. We followed the pipeline example of the software factory that you can find here.
dockerize:
  stage: dockerize
  image:
    name: gcr.io/kaniko-project/executor:debug
    entrypoint: [""]
  script:
    - echo "$CI_COMMIT_TAG"
    - echo "{\"auths\":{\"$ARTIFACTORY_URL\":{\"username\":\"$ARTIFACTORY_USER\",\"password\":\"$ARTIFACTORY_PASSWORD\"}}}" > /kaniko/.docker/config.json
    - /kaniko/executor --context $CI_PROJECT_DIR --dockerfile $CI_PROJECT_DIR/Dockerfile --destination artifactory.thalesdigital.io/docker-public/k8s-enabling/warp10:$CI_COMMIT_TAG
manualdeploy_k8s:
This job uses yaml manifest located in ./ManualDeployment to deploy the Warp10 Covid Tracker Dashboard to a K8SaaS cluster in dev namespace using Kubectl cli. It deploys the pod, the service, the tls secret and the ingress.
manualdeploy_k8s:
  stage: deploysandbox
  image: bitnami/kubectl:latest
  before_script:
    - echo ${KUBE_CONFIG_K8SAAS} | base64 -d > ${KUBECONFIG}
    - export KUBECONFIG=${KUBECONFIG}
  script:
    - kubectl apply -f ./ManualDeployment/warp10-dashboard-ingress.yml -n $NAMESPACE_K8SAAS
    - kubectl apply -f ./ManualDeployment/warp10-dashboard.yml -n $NAMESPACE_K8SAAS
Finally,
The following html code will call the warp10 instance api using the read token (more information about warp10 tokens could be found here) via discovery. More informations about discovery could be found here. You can your own warp10 script code in the right section the show your own dashboard.
<html>

<head>
    <title>Covid Tracker</title>
    <link rel="preconnect" href="https://fonts.googleapis.com">
    <link rel="preconnect" href="https://fonts.gstatic.com" crossorigin>
    <link href="https://fonts.googleapis.com/css2?family=Quicksand:wght@300;400;500;600;700&display=swap"
        rel="stylesheet">
    <style>
        html,
        body {
            padding: 0;
            margin: 0;
            font-family: 'Quicksand', sans-serif;
        }

        discovery-dashboard {
            color: transparent;
        }
    </style>
</head>

<body>
    <discovery-dashboard url="https://sandbox.senx.io/api/v0/exec">
        // Your dashboard code here
        'Read Token' 'token' STORE
        'France' 'country' STORE[ $token 'covid' { 'country' $country } NOW 365 d 5 * ] FETCH WRAP
        'fiveYearsOfData' STORE
        {
            'title' 'Covid'
            'description' 'The Covid 19 dashboard'
            'cellHeight' 120
            'options' {
                'scheme' 'CHARTANA'
                'customStyles' {
                    '.discovery-dashboard-main'
                    <'
                        margin: 0; font-size : 12px;
                        background-color: #FAFBFF;
                        line-height : 1.52;
                        color : #1b1b1b;
                        --warp-view-font-color : #404040;
                        --warp-view-chart-label-color : #404040;
                        --gts-stack-font-color : #404040;
                        --warp-view-chart-legend-bg : #000;
                        --gts-labelvalue-font-color : #ccc;
                        --gts-separator-font-color : #404040;
                        --gts-labelname-font-color : rgb(105, 223, 184);
                        --gts-classname-font-color : rgb(126, 189, 245);
                        --warp-view-chart-legend-color : #404040;
                        --warp-view-tile-background : rgba(254,254,254, 0.85);
                        background : url('https://blog.senx.io/wp-content/uploads/2021/06/background_templatecovid-02.png') !important;
                    '>
                    '.discovery-dashboard-main h1' 'font-size: 5em; font-weight: 400; margin: 0;'
                    '.discovery-dashboard-main p' 'font-size: 1.5em;'
                }
            } 'vars' {
                'token' $token
                'country' $country
                'fiveYearsOfData' $fiveYearsOfData
                'mapping' { ... }
            } 'tiles' [ ...]
        } // no need to call a macro
    </discovery-dashboard>
            <!-- Import Discovery -->
            <script nomodule src="https://unpkg.com/@senx/discovery-widgets/dist/discovery/discovery.js"></script>
            <script type="module" src="https://unpkg.com/@senx/discovery-widgets/dist/discovery/discovery.esm.js"></script>
</body>
</html>
Next steps
- Have a look to Warp10 online documentation
- Use Warp10 on AIS data
- Use Warp10 to discover traffic data for Smart Cities
- Use Warp10 for Covid Tracker
Known issues
At this moment, the deployment is not scalable. When you scale the deployment and generate a token from a pod, you may get an error message saying that the token is invalid. We are working on it.